Last update: 2021.04.06
Kid Safe Proxy Filter
This is a quick-reference guide to setting up a highly configurable web filter on a Raspberry Pi. The filter will be configured to block ads, websites with mild to hard adult content as well as other malware and phishing sites. For this project, I am using a Raspberry Pi 4 Model B (4G) with the Raspberry Pi OS Lite (buster).
The IP range of my LAN network is of type 192.168.1.0/24. Adjust as needed if you have a different range.
I don’t take any credit for the below, all was found on the Internet and gathered from various specialised websites. In each section, I have put reference links (those I still have or that are still alive).
English is not my mother tongue, I apologise for any mistake, typo and grammar.
Feel free to leave a message, ask a question or make a suggestion in the chat box at the bottom of the page.
Main programs to install
- Dnsmasq: a lightweight DHCP and caching DNS server
- Privoxy: a non-caching web proxy with filtering capabilities for enhancing privacy
- Squid: a caching web proxy
- SquidGuard: a URL redirector used in conjunction with squid
- Nginx: an open source high-performance HTTP server
- Clamav: an open source antivirus engine
- SquidClamav: an antivirus for Squid
Other programs (optional)
- Danted: a Socks5 Proxy
- UFW: an Uncomplicated FireWall
- Watchdog: a tool that can automatically reboot the Raspberry Pi in case it goes down
- Webmin: a web-based interface for system administration
- mSMTP: a light SMTP client
- CCZE: a log colorizer
Part 1: Preparation
First, update the system
sudo apt-get update && sudo apt-get upgrade -y
Now, we will assign a static IP to the Raspberry Pi.
Open the configuration file
sudo nano /etc/dhcpcd.conf
Add the following lines at the end. Make sure you have adjusted the following line with a full IP address according to your need (replace the xxx).
static ip_address=192.168.1.xxx/24
...
#Static IP on eth0<br />

interface eth0
static ip_address=192.168.1.xxx/24
static routers=192.168.1.1
static domain_name_servers=192.168.1.1
Save and close with ctrl-x y return
To increase security, we will change the default username (pi).
Type
groups
The output should look similar this:
Delete pi and add the new username at the end of the line. Each group must be separated by a comma; no space.
Replace new_username with whatever you like.
sudo useradd -m -G adm,dialout,cdrom,sudo,audio,video,plugdev,games,users,input,netdev,gpio,i2c,spi new_username
Set a password for the new username.
sudo passwd new_username
Enter your new password twice until you see the confirmation that it has been updated successfully
Retype new password:
passwd: password updated successfully
Next, open
sudo nano /etc/systemd/system/autologin@.service
Find
Replace with
Save and close with ctrl-x y return
To remove the password prompt (optional), open /etc/sudoers
sudo nano /etc/sudoers
Add at the end
new_username ALL=(ALL) NOPASSWD: ALL
Reboot and log in using the new username and password.
Now, you can delete the old username “pi”
sudo deluser --remove-all-files pi
You should see the following
Warning: group `pi' has no more members.
Done.
Done!
Reference
https://www.raspberrypi.org/documentation/linux/usage/users.md
Part 2: Main programs to install
Dnsmasq
Dnsmasq is a DNS server. It translates domain names into IP addresses and speed up the Internet browsing.
Test first with
cat /etc/resolv.conf
You should see something similar to:
search home
nameserver 192.168.1.1
nameserver fdaa:bbcc:ddee::1
Install Dnsmasq
sudo apt-get install dnsmasq
Test again with
cat /etc/resolv.conf
Now you should see:
search home
nameserver 127.0.0.1
Open the dnsmasq.conf file
sudo nano /etc/dnsmasq.conf
Find and uncomment (remove the # at the start of the line)
domain-needed
bogus-priv
no-resolv
Find
#cache-size=150
Replace with
cache-size=1000
Find
#server=/localnet/192.168.0.1
Add
#server=/localnet/192.168.0.1
server=8.8.8.8
server=8.8.4.4
Save and close with ctrl-x y return
Restart Dnsmasq
sudo service dnsmasq restart
Check that it has started up correctly. The status output should show: Active: active (running).
sudo service dnsmasq status
Test the result with dnsutils
sudo apt-get install dnsutils
Test the DNS service with
dig digitalocean.com
Run the command twice and check changes in the “Query time”. The second time it should be close to 0 msec
;; global options: +cmd
;; Got answer:
;; ->>HEADER<<- opcode: QUERY, status: NOERROR, id: 14033
;; flags: qr rd ra; QUERY: 1, ANSWER: 2, AUTHORITY: 0, ADDITIONAL: 1
;; OPT PSEUDOSECTION:
; EDNS: version: 0, flags:; udp: 4096
;; QUESTION SECTION:
;digitalocean.com. IN A
;; ANSWER SECTION:
digitalocean.com. 1 IN A 104.16.181.15
digitalocean.com. 1 IN A 104.16.182.15
;; Query time: 0 msec
;; SERVER: 127.0.0.1#53(127.0.0.1)
;; WHEN: Sun Sep 20 00:22:59 CEST 2020
;; MSG SIZE rcvd: 77
Reference
https://pimylifeup.com/raspberry-pi-static-ip-address/
https://pimylifeup.com/raspberry-pi-dns-server/
Privoxy
Install Privoxy
sudo apt-get install privoxy
Make a backup copy of the configuration file
sudo cp /etc/privoxy/config /etc/privoxy/config.bkp
This step is optional, it removes all the lines in the config file that starts with #.
sudo su

cat /etc/privoxy/config.bkp | egrep -v -e '^[[:blank:]]*#|^$' > /etc/privoxy/config

exit
Open the configuration file
sudo nano /etc/privoxy/config
Modify the configuration as below and make sure the listen-address with the static IP adress of the Rasperry Pi as set previously.
The Privoxy default port is 8118, it can be changed if needed.
listen-address 192.168.1.xxx:8118
...
user-manual /usr/share/doc/privoxy/user-manual
confdir /etc/privoxy
logdir /var/log/privoxy

actionsfile match-all.action # Actions that are applied to all sites and maybe overruled later on.
actionsfile default.action   # Main actions file
actionsfile user.action      # User customizations

filterfile default.filter
filterfile user.filter      # User customizations

logfile logfile

listen-address  192.168.1.xxx:8118

toggle  1
enable-remote-toggle  0
enable-remote-http-toggle  0
enable-edit-actions 1   # Change this value to 0 if you want to prevent users to edit the default configuration
enforce-blocks 0
buffer-limit 4096
enable-proxy-authentication-forwarding 0
forwarded-connect-retries  0
accept-intercepted-requests 0
allow-cgi-request-crunching 0
split-large-forms 0
keep-alive-timeout 5
tolerate-pipelining 1
socket-timeout 300
debug  4096
Save and close with ctrl-x y return
Restart Privoxy
sudo service privoxy restart
Check that it has started up correctly. The status output should show: Active: active (running).
sudo service privoxy status
Test it!
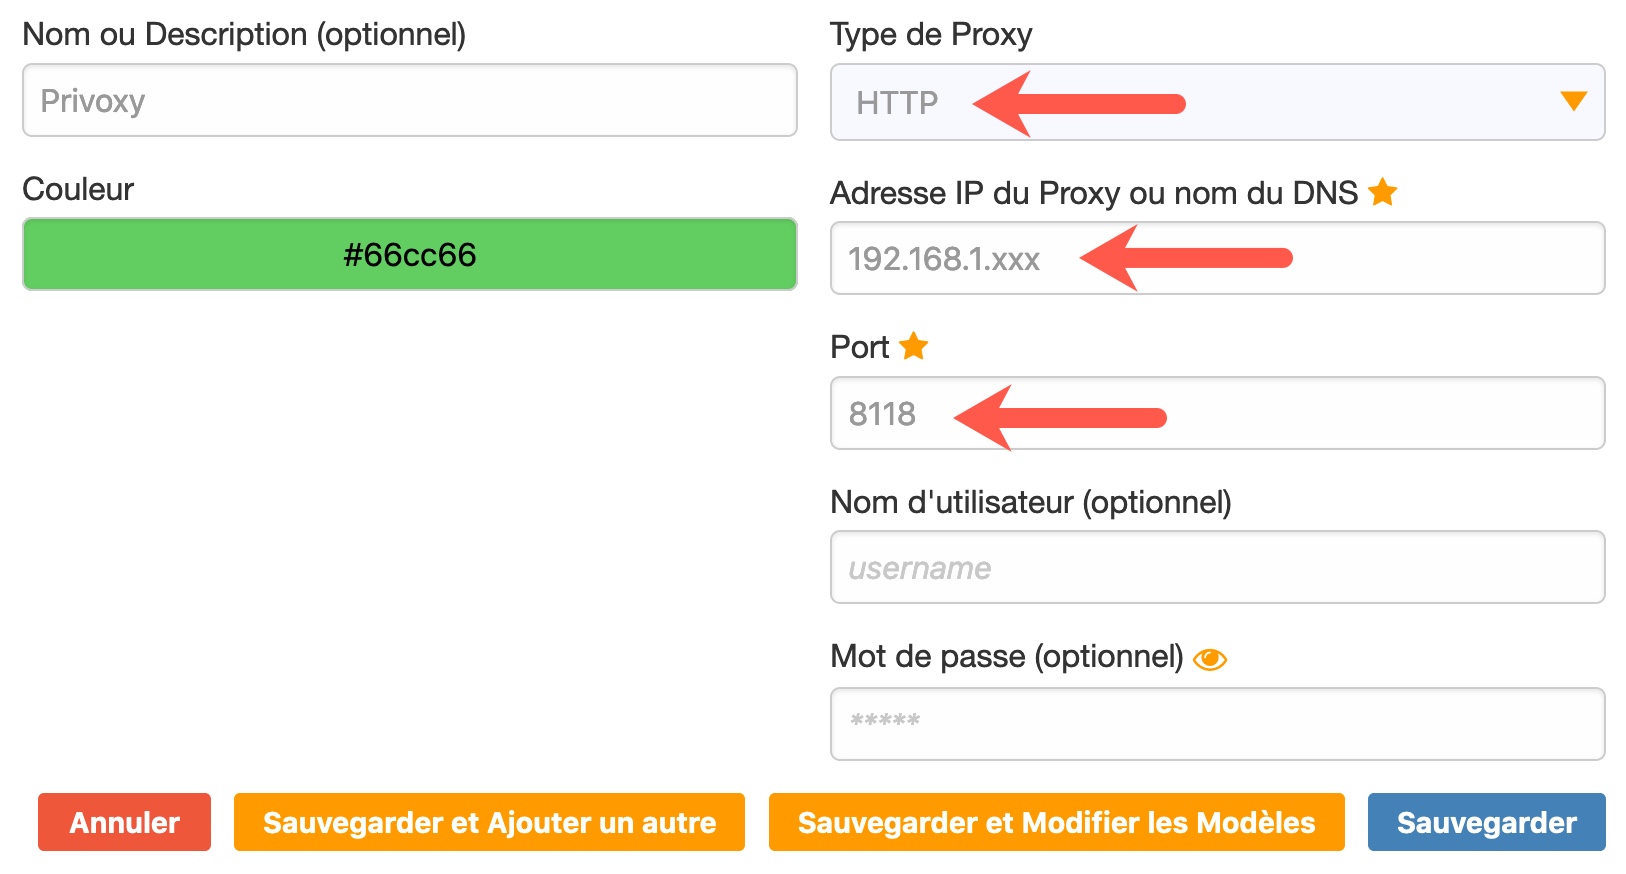
Privoxy is not set as a transparent (intercept) proxy. This means that the browser needs to point to the server. FoxyProxy is a nice extension that works well with both Chrome and Firefox. We will use this to configure the browser to point directly to the proxy server.
- Install the extension
- In “Options” create a new configuration with:
- Type of Proxy: HTTP
- IP Adrdress: 192.168.1.xxx
- Port 8118 (Privoxy’s default port)
- Save and apply
In your browser’s URL bar, type http://p.p/ You should see the following
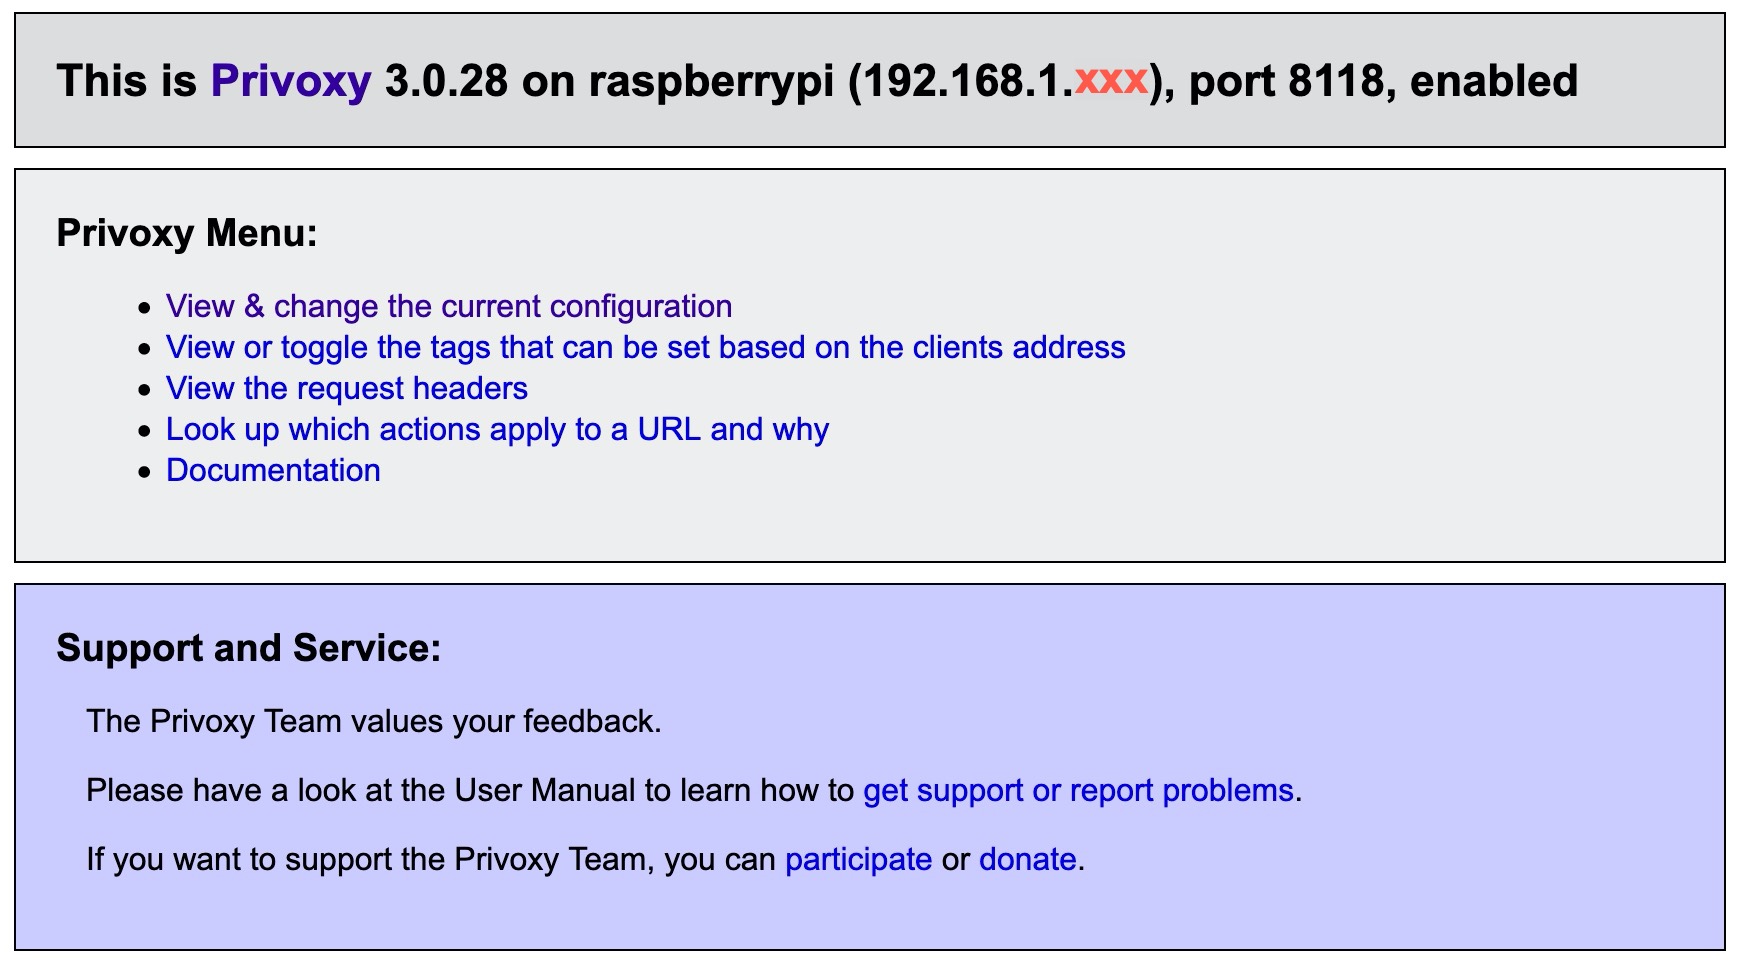
Congratulation!Privoxy is correctly configured and all requests are filtered with the default settings.
Add more blocklists (optional)
Here, we will install two scripts, one that automatically download and install blocklists from https://easylist.to/, and the other that convert the syntax to make the list compatible with Privoxy.
Here are the blocklists that the script will install, you can modify as needed:
- easylist: # the primary filter list that removes most adverts from international webpages
- easyprivacy: # an optional supplementary filter list that completely removes all forms of tracking from the internet
- fanboy-annoyance: # blocks Social Media content, in-page pop-ups and other annoyances
- fanboy-social: # removes Social Media content on web pages such as the Facebook like button and other widgets
- easylist-cookie: # blocks cookies banners
- liste_fr: # specifically removes adverts on French language websites
- antiadblockfilters: # Adblock Warning Removal List
- adblock-list.txt: # protects from online scams
- malwaredomains_full: # a list of malware domains generated from malwaredomains.com
Script 1: The blocklist install script (privoxy-blocklist.sh)
sudo nano /usr/local/bin/privoxy-blocklist.sh
Copy-paste the following or download the script here
#!/bin/bash
#
######################################################################
#
#                  Author: Andrwe Lord Weber
#                  Mail: lord-weber-andrwe <at> andrwe <dot> org
#                  Version: 0.3
#                  URL: http://andrwe.dyndns.org/doku.php/scripting/bash/privoxy-blocklist
#
##################
#
#                  Sumary:
#                   This script downloads, converts and installs
#                   AdblockPlus lists into Privoxy
#
######################################################################

######################################################################
#
#                 TODO:
#                  - implement:
#                     domain-based filter
#                     id->class combination
#                     class->id combination
#
######################################################################

# script config-file
SCRIPTCONF=/usr/local/bin/privoxy-blacklist
DEPENDS=( 'sed' 'grep' 'bash' 'wget' )

######################################################################
#
#                  No changes needed after this line.
#
######################################################################

function usage()
{
  echo "${TMPNAME} is a script to convert AdBlockPlus-lists into Privoxy-lists and install them."
  echo " "
  echo "Options:"
  echo "      -h:    Show this help."
  echo "      -q:    Don't give any output."
  echo "      -v 1:  Enable verbosity 1. Show a little bit more output."
  echo "      -v 2:  Enable verbosity 2. Show a lot more output."
  echo "      -v 3:  Enable verbosity 3. Show all possible output and don't delete temporary files.(For debugging only!!)"
  echo "      -r:    Remove all lists build by this script."
}

[ ${UID} -ne 0 ] && echo -e "Root privileges needed. Exit.\n\n" && usage && exit 1

for dep in ${DEPENDS[@]}
do
  if ! type -p ${dep} >/dev/null
  then
    echo "The command ${dep} can't be found. Please install the package providing ${dep} and run $0 again. Exit" >&2
    exit 1
  fi
done

if [[ ! -d "$(dirname ${SCRIPTCONF})" ]]
then
  echo "The config directory $(dirname ${SCRIPTCONF}) doesn't exist. Please either adjust the variable SCRIPTCONF in this script or create the directory." >&2
  exit 1
fi

function debug()
{
  [ ${DBG} -ge ${2} ] && echo -e "${1}"
}

function main()
{
  for url in ${URLS[@]}
  do
    debug "Processing ${url} ...\n" 0
    file=${TMPDIR}/$(basename ${url})
    actionfile=${file%\.*}.script.action
    filterfile=${file%\.*}.script.filter
    list=$(basename ${file%\.*})

    # download list
    debug "Downloading ${url} ..." 0
    wget -t 3 --no-check-certificate -O ${file} ${url} >${TMPDIR}/wget-${url//\//#}.log 2>&1
    debug "$(cat ${TMPDIR}/wget-${url//\//#}.log)" 2
    debug ".. downloading done." 0
    [ "$(grep -E '^.*\[Adblock.*\].*$' ${file})" == "" ] && echo "The list received from ${url} isn't an adult block list. Skipped" && continue

    # convert AdblockPlus list to Privoxy list
    # blacklist of urls
    debug "Creating actionfile for ${list} ..." 1
    echo -e "{ +block{${list}} }" > ${actionfile}
    sed '/^!.*/d;1,1 d;/^@@.*/d;/\$.*/d;/#/d;s/\./\\./g;s/\?/\\?/g;s/\*/.*/g;s/(/\\(/g;s/)/\\)/g;s/\[/\\[/g;s/\]/\\]/g;s/\^/[\/\&:\?=_]/g;s/^||/\./g;s/^|/^/g;s/|$/\$/g;/|/d' ${file} >> ${actionfile}

    debug "... creating filterfile for ${list} ..." 1
    echo "FILTER: ${list} Tag filter of ${list}" > ${filterfile}
    # set filter for html elements
    sed '/^#/!d;s/^##//g;s/^#\(.*\)\[.*\]\[.*\]*/s@<([a-zA-Z0-9]+)\\s+.*id=.?\1.*>.*<\/\\1>@@g/g;s/^#\(.*\)/s@<([a-zA-Z0-9]+)\\s+.*id=.?\1.*>.*<\/\\1>@@g/g;s/^\.\(.*\)/s@<([a-zA-Z0-9]+)\\s+.*class=.?\1.*>.*<\/\\1>@@g/g;s/^a\[\(.*\)\]/s@<a.*\1.*>.*<\/a>@@g/g;s/^\([a-zA-Z0-9]*\)\.\(.*\)\[.*\]\[.*\]*/s@<\1.*class=.?\2.*>.*<\/\1>@@g/g;s/^\([a-zA-Z0-9]*\)#\(.*\):.*[\:[^:]]*[^:]*/s@<\1.*id=.?\2.*>.*<\/\1>@@g/g;s/^\([a-zA-Z0-9]*\)#\(.*\)/s@<\1.*id=.?\2.*>.*<\/\1>@@g/g;s/^\[\([a-zA-Z]*\).=\(.*\)\]/s@\1^=\2>@@g/g;s/\^/[\/\&:\?=_]/g;s/\.\([a-zA-Z0-9]\)/\\.\1/g' ${file} >> ${filterfile}
    debug "... filterfile created - adding filterfile to actionfile ..." 1
    echo "{ +filter{${list}} }" >> ${actionfile}
    echo "*" >> ${actionfile}
    debug "... filterfile added ..." 1

    # create domain based whitelist

    # create domain based blacklist
#    domains=$(sed '/^#/d;/#/!d;s/,~/,\*/g;s/~/;:\*/g;s/^\([a-zA-Z]\)/;:\1/g' ${file})
#    [ -n "${domains}" ] && debug "... creating domainbased filterfiles ..." 1
#    debug "Found Domains: ${domains}." 2
#    ifs=$IFS
#    IFS=";:"
#    for domain in ${domains}
#    do
#      dns=$(echo ${domain} | awk -F ',' '{print $1}' | awk -F '#' '{print $1}')
#      debug "Modifying line: ${domain}" 2
#      debug "   ... creating filterfile for ${dns} ..." 1
#      sed '' ${file} > ${file%\.*}-${dns%~}.script.filter
#      debug "   ... filterfile created ..." 1
#      debug "   ... adding filterfile for ${dns} to actionfile ..." 1
#      echo "{ +filter{${list}-${dns}} }" >> ${actionfile}
#      echo "${dns}" >> ${actionfile}
#      debug "   ... filterfile added ..." 1
#    done
#    IFS=${ifs}
#    debug "... all domainbased filterfiles created ..." 1

    debug "... creating and adding whitlist for urls ..." 1
    # whitelist of urls
    echo "{ -block }" >> ${actionfile}
    sed '/^@@.*/!d;s/^@@//g;/\$.*/d;/#/d;s/\./\\./g;s/\?/\\?/g;s/\*/.*/g;s/(/\\(/g;s/)/\\)/g;s/\[/\\[/g;s/\]/\\]/g;s/\^/[\/\&:\?=_]/g;s/^||/\./g;s/^|/^/g;s/|$/\$/g;/|/d' ${file} >> ${actionfile}
    debug "... created and added whitelist - creating and adding image handler ..." 1
    # whitelist of image urls
    echo "{ -block +handle-as-image }" >> ${actionfile}
    sed '/^@@.*/!d;s/^@@//g;/\$.*image.*/!d;s/\$.*image.*//g;/#/d;s/\./\\./g;s/\?/\\?/g;s/\*/.*/g;s/(/\\(/g;s/)/\\)/g;s/\[/\\[/g;s/\]/\\]/g;s/\^/[\/\&:\?=_]/g;s/^||/\./g;s/^|/^/g;s/|$/\$/g;/|/d' ${file} >> ${actionfile}
    debug "... created and added image handler ..." 1
    debug "... created actionfile for ${list}." 1

    # install Privoxy actionsfile
    install -o ${PRIVOXY_USER} -g ${PRIVOXY_GROUP} ${VERBOSE} ${actionfile} ${PRIVOXY_DIR}
    if [ "$(grep $(basename ${actionfile}) ${PRIVOXY_CONF})" == "" ]
    then
      debug "\nModifying ${PRIVOXY_CONF} ..." 0
      sed "s/^actionsfile user\.action/actionsfile $(basename ${actionfile})\nactionsfile user.action/" ${PRIVOXY_CONF} > ${TMPDIR}/config
      debug "... modification done.\n" 0
      debug "Installing new config ..." 0
      install -o ${PRIVOXY_USER} -g ${PRIVOXY_GROUP} ${VERBOSE} ${TMPDIR}/config ${PRIVOXY_CONF}
      debug "... installation done\n" 0
    fi

    # install Privoxy filterfile
    install -o ${PRIVOXY_USER} -g ${PRIVOXY_GROUP} ${VERBOSE} ${filterfile} ${PRIVOXY_DIR}
    if $(grep $(basename ${filterfile}) ${PRIVOXY_CONF})
    #if [ "$(grep $(basename ${filterfile}) ${PRIVOXY_CONF})" == "" ]
    then
      debug "\nModifying ${PRIVOXY_CONF} ..." 0
      sed "s/^\(#*\)filterfile user\.filter/filterfile $(basename ${filterfile})\n\1filterfile user.filter/" ${PRIVOXY_CONF} > ${TMPDIR}/config
      debug "... modification done.\n" 0
      debug "Installing new config ..." 0
      install -o ${PRIVOXY_USER} -g ${PRIVOXY_GROUP} ${VERBOSE} ${TMPDIR}/config ${PRIVOXY_CONF}
      debug "... installation done\n" 0
    fi

    debug "... ${url} installed successfully.\n" 0
  done
}

if [[ ! -f "${SCRIPTCONF}" ]]
then
  echo "No config found in ${SCRIPTCONF}. Creating default one and exiting because you might have to adjust it."
  echo "# Config of privoxy-blocklist

# array of URL for AdblockPlus lists
#  for more sources just add it within the round brackets
URLS=(\"https://easylist.to/easylist/easylist.txt\" \"https://easylist.to/easylist/easyprivacy.txt\" \"https://easylist.to/easylist/fanboy-annoyance.txt\" \"https://easylist.to/easylist/fanboy-social.txt\" \"https://easylist-downloads.adblockplus.org/easylist-cookie.txt\" \"https://easylist-downloads.adblockplus.org/liste_fr.txt\" \"https://easylist-downloads.adblockplus.org/antiadblockfilters.txt\" \"https://raw.githubusercontent.com/Dawsey21/Lists/master/adblock-list.txt\" \"https://easylist-downloads.adblockplus.org/malwaredomains_full.txt\")

# config for privoxy initscript providing PRIVOXY_CONF, PRIVOXY_USER and PRIVOXY_GROUP
INIT_CONF=\"/etc/conf.d/privoxy\"

# !! if the config above doesn't exist set these variables here !!
# !! These values will be overwritten by INIT_CONF !!
PRIVOXY_USER=\"proxy\"
PRIVOXY_GROUP=\"proxy\"
PRIVOXY_CONF=\"/etc/privoxy/config\"

# name for lock file (default: script name)
TMPNAME=\"\$(basename \${0})\"
# directory for temporary files
TMPDIR=\"/tmp/\${TMPNAME}\"

# Debug-level
#   -1 = quiet
#    0 = normal
#    1 = verbose
#    2 = more verbose (debugging)
#    3 = incredibly loud (function debugging)
DBG=0
" > "${SCRIPTCONF}"
  exit 1
fi

[[ ! -r "${SCRIPTCONF}" ]] && debug "Can't read ${SCRIPTCONF}. Permission denied." -1

# load script config
source "${SCRIPTCONF}"
# load privoxy config
[[ -r "${INIT_CONF}" ]] && source "${INIT_CONF}"

# check whether needed variables are set
[[ -z "${PRIVOXY_CONF}" ]] && echo "\$PRIVOXY_CONF isn't set please either provice a valid initscript config or set it in ${SCRIPTCONF} ." >&2 && exit 1
[[ -z "${PRIVOXY_USER}" ]] && echo "\$PRIVOXY_USER isn't set please either provice a valid initscript config or set it in ${SCRIPTCONF} ." >&2 && exit 1
[[ -z "${PRIVOXY_GROUP}" ]] && echo "\$PRIVOXY_GROUP isn't set please either provice a valid initscript config or set it in ${SCRIPTCONF} ." >&2 && exit 1

# set command to be run on exit
[ ${DBG} -le 2 ] && trap "rm -fr ${TMPDIR};exit" INT TERM EXIT

# set privoxy config dir
PRIVOXY_DIR="$(dirname ${PRIVOXY_CONF})"

# create temporary directory and lock file
install -d -m700 ${TMPDIR}

# check lock file
if [ -f "${TMPDIR}/${TMPNAME}.lock" ]
then
  read -r fpid <"${TMPDIR}/${TMPNAME}.lock"
  ppid=$(pidof -o %PPID -x "${TMPNAME}")
  if [[ $fpid = "${ppid}" ]]
  then
    echo "An Instance of ${TMPNAME} is already running. Exit" && exit 1
  else
    debug "Found dead lock file." 0
    rm -f "${TMPDIR}/${TMPNAME}.lock"
    debug "File removed." 0
  fi
fi

# safe PID in lock-file
echo $$ > "${TMPDIR}/${TMPNAME}.lock"

# loop for options
while getopts ":hrqv:" opt
do
  case "${opt}" in
    "v")
      DBG="${OPTARG}"
      VERBOSE="-v"
      ;;
    "q")
      DBG=-1
      ;;
    "r")
      read -p "Do you really want to remove all build lists?(y/N) " choice
      [ "${choice}" != "y" ] && exit 0
      rm -rf ${PRIVOXY_DIR}/*.script.{action,filter} && \
      sed '/^actionsfile .*\.script\.action$/d;/^filterfile .*\.script\.filter$/d' -i ${PRIVOXY_CONF} && echo "Lists removed." && exit 0
      echo -e "An error occured while removing the lists.\nPlease have a look into ${PRIVOXY_DIR} whether there are .script.* files and search for *.script.* in ${PRIVOXY_CONF}."
      exit 1
      ;;
    ":")
      echo "${TMPNAME}: -${OPTARG} requires an argument" >&2
      exit 1
      ;;
    "h"|*)
      usage
      exit 0
      ;;
  esac
done

debug "URL-List: ${URLS}\nPrivoxy-Configdir: ${PRIVOXY_DIR}\nTemporary directory: ${TMPDIR}" 2
main

# restore default exit command
trap - INT TERM EXIT
[ ${DBG} -lt 3 ] && rm -r ${VERBOSE} "${TMPDIR}"
exit 0
Save and close with ctrl-x y return
Run the script
sudo bash /usr/local/bin/privoxy-blocklist.sh
Note The first time you run the script, a file named "privoxy-blacklist" is created in /usr/local/bin/. You should see the message below
No config found in /usr/local/bin/privoxy-blacklist. Creating default one and exiting because you might have to adjust it.Open the privoxy-blacklist file and edit if needed.
sudo nano /usr/local/bin/privoxy-blacklist
This is how it looks like in my Raspberry Pi
# Config of privoxy-blocklist

# array of URL for AdblockPlus lists
#  for more sources just add it within the round brackets
URLS=("https://easylist.to/easylist/easylist.txt" "https://easylist.to/easylist/easyprivacy.txt" "https://easylist.to/easylist/fanboy-annoyance.txt" "https://easylist.to/easylist/fanboy-social.txt" "https://easylist-downloads.adblockplus.org/easylist-cookie.txt" "https://easylist-downloads.adblockplus.org/liste_fr.txt" "https://easylist-downloads.adblockplus.org/antiadblockfilters.txt" "https://raw.githubusercontent.com/Dawsey21/Lists/master/adblock-list.txt" "https://easylist-downloads.adblockplus.org/malwaredomains_full.txt")

# config for privoxy initscript providing PRIVOXY_CONF, PRIVOXY_USER and PRIVOXY_GROUP
INIT_CONF="/etc/conf.d/privoxy"

# !! if the config above doesn't exist set these variables here !!
# !! These values will be overwritten by INIT_CONF !!
PRIVOXY_USER="proxy"
PRIVOXY_GROUP="proxy"
PRIVOXY_CONF="/etc/privoxy/config"

# name for lock file (default: script name)
TMPNAME="$(basename ${0})"
# directory for temporary files
TMPDIR="/tmp/${TMPNAME}"

# Debug-level
#   -1 = quiet
#    0 = normal
#    1 = verbose
#    2 = more verbose (debugging)
#    3 = incredibly loud (function debugging)
DBG=0
Run the script once again and wait for the blocklists to be installed. This should take one minute or so
sudo bash /usr/local/bin/privoxy-blocklist.sh
Script 2: The syntax conversion script (blocklist2privoxy.sh)
sudo bash /usr/local/bin/blocklist2privoxy.sh
Copy-paste the following or download the script here
#!/bin/bash
#
# ╔═╗┌─┐─┐ ┬┌─┐┌─┐┬┌┬┐┌─┐
# ╠╣ ├─┤┌┴┬┘│ │├─┘│ │ ├─┤
# ╚  ┴ ┴┴ └─└─┘┴  ┴ ┴ ┴ ┴
# from “The Un-Official Proxomitron Forum”
#
# Improve your Privoxy skills:
# https://www.prxbx.com/forums/forumdisplay.php?fid=49
#
# Add-on to privoxy-adblock
# Rewrite syntax in .action files supplied by `privoxy-adblock.sh`
#
# Script tested successfully with GNU sed 4.2.2. and GNU grep 2.27

# Original script by Faxopita, slightly modified by lls on 2020.10.03
# https://www.prxbx.com/forums/showthread.php?tid=2261

# User-defined Variables:
#
ADB_path="/etc/privoxy"
#
# #######################

echo "Correcting blocklists syntax"

mkdir -p /tmp/blocklist2privoxy/Converted/ /tmp/blocklist2privoxy/Old/ /tmp/blocklist2privoxy/Diff/

WorkingPathDir="/tmp/blocklist2privoxy"

cd $ADB_path
cp *.script.action $WorkingPathDir/

cd $WorkingPathDir/
cp $ADB_path/*.script.action ./Old/

FileList=*.script.action

for f in $FileList
do
# Deactivation of White List
  sed -r '/^\s*\{\s*-(block|filter)/,/\{-1/ d' $f | \
  sed -r '/^[^.]?http:\/\/(\.\*.*|$)/d' | \

# Deletion of http://
# sed -r '/^[^.]?http:\/\/(\.\*.*|$)/d' $f | \
  sed -r 's/^[^.]?http:\/\//./g' | \

# Path Pattern Format
  sed -r 's/^\//\/(.*\/)?/g' | \

  sed -r 's/^(\\\.[^/[]*\\.)$/\/.*\1/g' | \
  sed -r 's/^(\\\.[^/.[]*\/)$/\/.*\1/g' | \
  sed -r 's/^([^a-zA-Z0-9\.*{/])/\/.*\1/g' | \

  sed -r 's/^(\\[^.])/\/.*\1/g' | \
  sed -r 's/(\\[a-z])/\\\1/g' | \
  sed -r 's/^(\\.[0-9]+(x|X)[0-9]+)/\/.*\1/g' | \
  sed -r 's/^(\\.([^/]+\.)?(css|js|php|json))/\/.*\1/g' | \
  sed -r 's/^(\\.[^./]+(\?|%)[^./]*)/\/.*\1/g' | \
  sed -r 's/^\\.([^/]+)\\.\s*$/.\1./g' | \

# sed -r 's/^\\.(.+\/)\s*$/.\1/g' | \
  sed -r '/^\\\.(1|a)d\//!s/^\\.(.+\/)\s*$/.\1/g' | \

  sed -r 's/^(\\.[^./]+[^a-zA-Z0-9])\s*$/\/.*\1/g' | \

# sed -r 's/^\\.([a-zA-Z]+\/.+)/.\1/g' | \
  sed -r '/^\\\.(1|a)d\//!s/^\\.([a-zA-Z]+\/.+)/.\1/g' | \

  sed -r 's/^\\.([a-zA-Z]+)\\.([a-zA-Z]+\/.+)/.\1.\2/g' | \
  sed -r 's/^(\\.[^./]+\[)/\/.*\1/g' | \
  sed -r 's/^(\\..+)/\/.*\1/g' | \
  sed -r '/^\.[^/]+(\\.[^/]+)?(\/|\.)$/s/\\././g' | \
  sed -r 's/^(\.[^/]+)\/\s*$/\1/g' | \

  sed -r 's/^([a-zA-Z])/\/(.*[^a-z])?\1/g' | \
  sed -r 's/^([0-9])/\/(.*[^0-9])?\1/g' | \
  sed -r 's/\*\+/*\\+/g; s/([^.\])(\+)/\1\\\2/g' | \
# sed -r 's/^\s*\*\s*$/\//g' | \

# Deletion of Duplicates
  awk '!x[$0]++' | \
#
  sed -r 's/^\s*\{/\n{/g' | \
  sed -r 's/netbb-\s*$/net\/bb-/g' | \

  tail -n +2 > TEMP.1

# Host Pattern Format
  sed -r '/^(\.[^/]+\/|\/.+)/!s/\\//g' TEMP.1 > TEMP.2
  sed -r '/^\..+\//!s/.*//g' TEMP.2 | cut -d'/' -f1  | \
  sed -r 's/\\//g; s/([^a-zA-Z0-9])\.\*/\1*/g; s/^(\..+)$/\1\//g' > domains
  sed -r '/^\..+\//!s/.*//g' TEMP.2 | cut -d'/' -f2- > paths
  paste domains paths | tr -d '\011' > TEMP.3

  sed -r '/^\..+\//s/.*//g' TEMP.2 > TEMP.4
  paste TEMP.3 TEMP.4 | tr -d '\011' | \

  sed -r '/^\..+/s/([^\])\.\./\1./g' | \

# Deletion of [/&:?=_] (the set [/&:?=_] has no effect on the Host part)
  sed -r '/^\.[^[]+\[/s/\[\/&:\?=_\]\.\*\//*\/(.*\/)?/g' | \
  sed -r '/^\.[^[]+\[/s/\[\/&:\?=_\]$//g' | \
  sed -r '/^\.[^[]+\[/s/\[\/&:\?=_\]\.\*(\[\/&:\?=_\])?([^/])/*\/.*\2/g' | \
  sed -r '/^\.[^[]+\[/s/\*\[\/&:\?=_\]\/?/*\/(.*\/)?/g' | \
  sed -r '/^\.[^[]+\[/s/\[\/&:\?=_\]\//*\/(.*\/)?/g' | \
  sed -r '/^\/.+\[/s/\[\/&:\?=_\]$//g' | \
  sed -r 's/\.\*$//g' > Converted/$f

  grep -Fvxf Old/$f Converted/$f > Diff/$f
  cat Converted/$f > $ADB_path/$f
done

rm -f TEMP.* domains paths
rm -rf $WorkingPathDir/

echo "Completed! -" $(date -u)
Save and close with ctrl-x y return
Now, let’s run the two scripts sequentially with one command line
sudo bash /usr/local/bin/privoxy-blocklist.sh && sudo bash /usr/local/bin/blocklist2privoxy.sh
Test it!
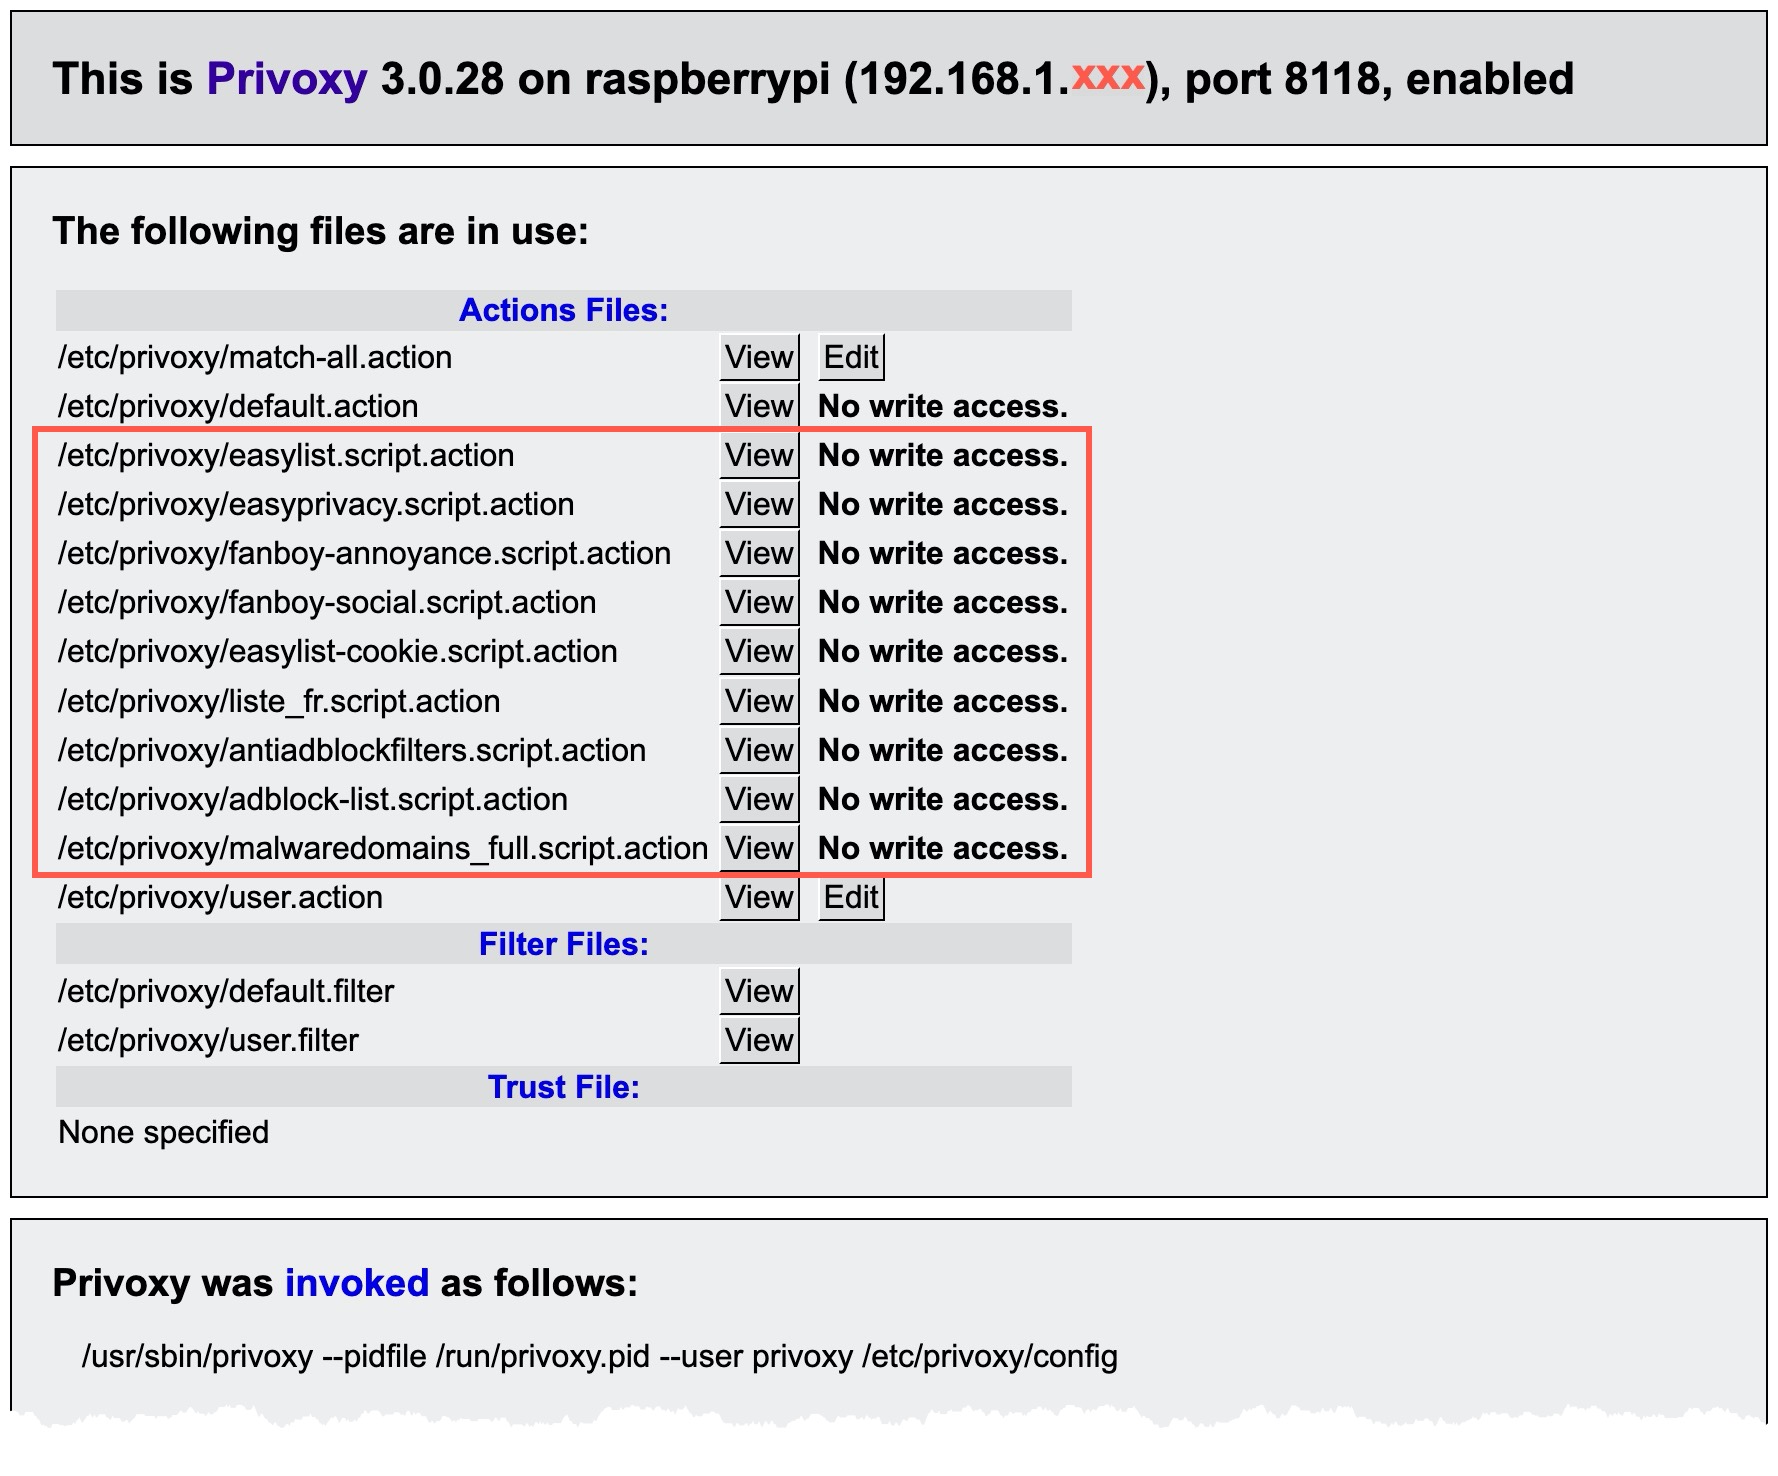
In your browser’s URL bar, type again http://p.p/
…and click on View & change the current configuration. You should see all the blocklists that were installed by the script.
Use Crontab to run the script automatically every day or week as prefered.
Reference
http://www.privoxy.org/
https://github.com/Andrwe/privoxy-blocklist/blob/master/privoxy-blocklist.sh
https://www.prxbx.com/forums/showthread.php?tid=2261
Squid
Install Squid
sudo apt-get install squid3
Make a backup copy of the configuration file
sudo cp /etc/squid/squid.conf /etc/squid/squid.conf.bkp
This step is optional, it removes all the lines in the config file that starts with #.
sudo su

cat /etc/squid/squid.conf.bkp | egrep -v -e '^[[:blank:]]*#|^$' > /etc/squid/squid.conf

exit
Open the configuration file
sudo nano /etc/squid/squid.conf
Modify the configuration as below and make sure you have adjusted the line below. This line tells Squid to listen to Privoxy on port 8118 (or whatever port you have selected), so we can chain the two proxys.
The Squid default port is 3128, it can be changed if needed.
cache_peer 192.168.1.xxx parent 8118 0 default no-query no-digest
...
visible_hostname squid.proxy.org

acl localnet src 192.168.1.0/24  # Home network

acl SSL_ports port 443
acl Safe_ports port 80           # http
acl Safe_ports port 21           # ftp
acl Safe_ports port 443          # https
acl Safe_ports port 70           # gopher
acl Safe_ports port 210          # wais
acl Safe_ports port 1025-65535   # unregistered ports
acl Safe_ports port 280          # http-mgmt
acl Safe_ports port 488          # gss-http
acl Safe_ports port 591          # filemaker
acl Safe_ports port 777          # multiling http
acl Safe_ports port 873          # rsync
acl Safe_ports port 10000        # Webmin

acl CONNECT method CONNECT

# block anything not targeting authorized ports
http_access deny !Safe_ports
http_access deny CONNECT !SSL_ports

# manager access
http_access allow localhost manager
http_access deny manager

# allow local networks
http_access allow localnet
http_access allow localhost

# deny anything else
http_access deny all

http_port 3128

cache_mem 512 MB
maximum_object_size_in_memory 1024 KB
minimum_object_size 0 KB
maximum_object_size 96 MB
memory_cache_mode always

cache_dir ufs /var/spool/squid 4096 16 256
coredump_dir /var/spool/squid

# More URL detail in logs:
logformat secdis %ts.%03tu %6tr %>a %>p %Ss/%03>Hs %<st %rm %ru %rp %rv %<a %<p %<A %mt %ssl::>sni "%{User-Agent}>h"
access_log      stdio:/var/log/squid/access.log secdis

refresh_pattern ^ftp: 1440 20% 10080
refresh_pattern ^gopher: 1440 0% 1440
refresh_pattern -i \.(gif|png|jpg|jpeg|ico)$ 10080 90% 43200 override-expire ignore-no-cache ignore-no-store ignore-private
refresh_pattern -i \.(iso|avi|wav|mp3|mp4|mpeg|swf|flv|x-flv)$ 43200 90% 432000 override-expire ignore-no-cache ignore-no-store ignore-private
refresh_pattern -i \.(deb|rpm|exe|zip|tar|tgz|ram|rar|bin|ppt|doc|tiff)$ 10080 90% 43200 override-expire ignore-no-cache ignore-no-store ignore-private
refresh_pattern -i \.index.(html|htm)$ 0 40% 10080
refresh_pattern -i \.(html|htm|css|js)$ 1440 40% 40320
refresh_pattern . 0 40% 40320

refresh_pattern -i youtube.com/.* 10080 90% 43200
refresh_pattern (/cgi-bin/|\?) 0 0% 0

cache_peer 192.168.1.xxx parent 8118 0 default no-query no-digest
acl ftp proto FTP
always_direct allow ftp
never_direct allow all
cache_effective_group proxy
Save and close with ctrl-x y return
Restart Squid
sudo service squid restart
Check that it has started up correctly. The status output should show: Active: active (running).
sudo service squid status
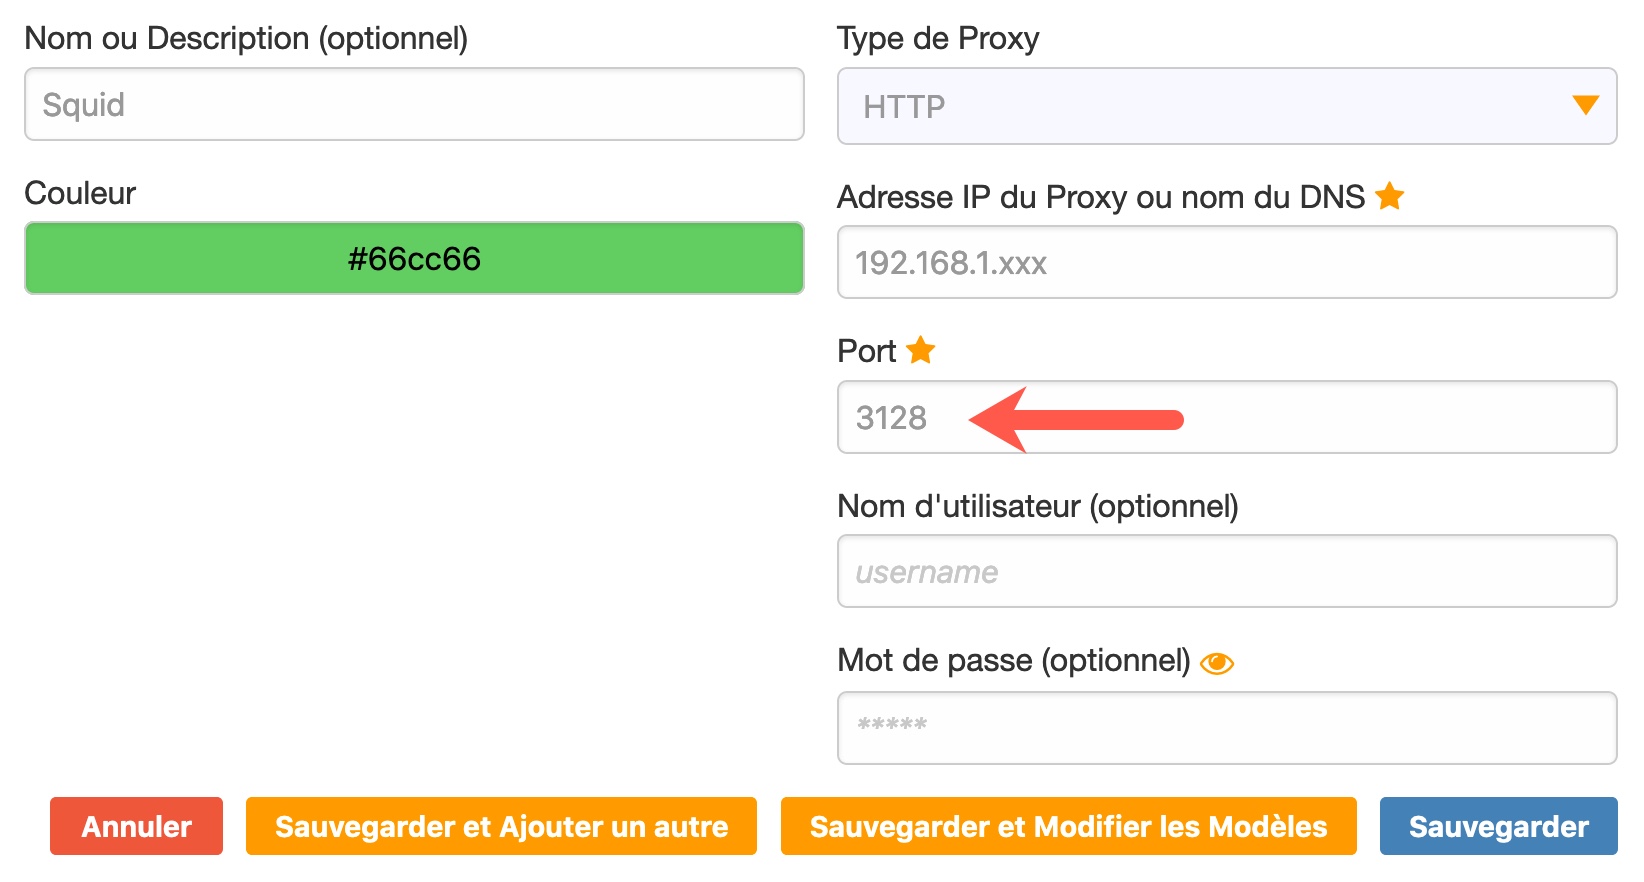
Now, in the FoxyProxy browser extension, change the port number from 8118 (the default Privoxy port) to 3128 (the default Squid port)
In your browser’s URL bar, type http://p.p/ You should see the following
Congratulation!Your browser is now pointing to Squid and all requests are filtered by both Squid and Privoxy.
Calamaris (optional)
calamaris is a tool to analyse Squid’s access.log.
Install Calamaris
sudo apt-get install calamaris
Sarg (optional)
Squid Analysis Report Generator (Sarg) is a tool that allows you to view “where” your users are going to on the Internet.
Install Sarg
sudo apt-get install sarg
Open the sarg.conf file
sudo nano /etc/sarg/sarg.conf
Uncomment the following line if you intend to generate graphs
graphs yes
...
graph_font /usr/share/fonts/truetype/ttf-dejavu/DejaVuSans.ttf
Save and close with ctrl-x y return
Reference
http://www.squid-cache.org/
https://www.securitydistractions.com/2020/09/03/squid-proxy-log-format/
https://www.linux.com/news/speed-your-internet-access-using-squids-refresh-patterns/
SquidGuard
This part requires several steps and is a bit more technical. We need to do a number of things:
- install SquidGuard
- configure SquidGuard to redirect any blocked request
- create a script that will download and install the blacklists
- install Nginx, the reverse web server, and create a page to be displayed when SquidGuard blocks a request
Install SquidGuard
sudo apt-get install squidguard
Open the configuration file
sudo nano /etc/squidguard/squidGuard.conf
Modify the configuration as below and make sure you have adjusted the redirect argument with the correct IP number. This line tells SquidGuard to redirect any filtered request to the “block” page.
redirect http://192.168.1.xxx/adult_block.php?caddr=%a&cname=%n&user=%i&group=%s&target=%t&url=%u
...
You can also define who is authorised to pass through the filters. Adjust the IP address in the authorised_user section with, for example, the IP address assigned to your personal machine (not the one you have assigned to your Raspberry PI). Any IP mentionned here will not be blocked.
dbhome /var/lib/squidguard/db
logdir /var/log/squidguard

#Any machine that should be authorised to pass through the filters
src authorised_user {
        ip              192.168.1.xxx
}

dest adult {
  domainlist adult/domains
  urllist adult/urls
  log adult
}

dest malware {
  domainlist malware/domains
  urllist malware/urls
  log malware
}

dest phishing {
  domainlist phishing/domains
  urllist phishing/urls
  log phishing
}

acl {
  authorised_user {
    pass all
  }

  default {
    pass !adult !malware !phishing all
    redirect http://192.168.1.xxx/adult_block.php?caddr=%a&cname=%n&user=%i&group=%s&target=%t&url=%u
}
}
This configuration will block any request that is filtered by the adult, malware and phishing blacklists. Of course you can add more if needed.
Now, we create a script that will automatically download and install the blacklists. Those are provided for free by the Université Toulouse 1 Capitole.
sudo nano /usr/local/bin/blacklist.sh
Copy-paste the following or download the script here
#!/bin/sh
#
# shalla_update.sh, v 0.3.1 20080403
# done by kapivie at sil.at under FreeBSD
# without any warranty
# updated by Len Tucker to create and use diff
# files to reduce load and increase speed.
# Added Checks for required elements
# Added output info for status of script
# Modified by Chris Kronberg: included loop; added some more
# checks; reduced the diff files to the necessary content.
#
#--------------------------------------------------
# little script (for crond)
# to fetch and modify new list from shallalist.de
#--------------------------------------------------
#
# *check* paths and squidGuard-owner on your system
# try i.e. "which squid" to find out the path for squid
# try "ps aux | grep squid" to find out the owner for squidGuard
#     *needs wget*
#

squidGuardpath="/usr/bin/squidGuard"
squidpath="/usr/sbin/squid"
tarpath="/bin/tar"
chownpath="/bin/chown"

dbhome="/var/lib/squidguard/db"
squidGuardowner="proxy:proxy"
blacklists="http://dsi.ut-capitole.fr/blacklists/download/blacklists.tar.gz"
wgetlogdir="/var/log/squidguard"

##########################################

workdir="/var/lib/squidguard/tmp"
if [ ! -d $workdir ]; then
  mkdir -p $workdir
fi

if [ ! -f $tarpath ]
 then echo "Could not locate tar."
      exit 1
fi

if [ ! -f $chownpath ]
 then echo "Could not locate chown."
      exit 1
fi

if [ ! -d  $dbhome ]
 then echo "Could not locate squid db directory."
      exit 1
fi

# check that everything is clean before we start.
if [ -f  $workdir/blacklists.tar.gz ]; then
   echo "Old blacklist file found in ${workdir}. Deleted!"
   rm $workdir/blacklists.tar.gz
fi

if [ -d $workdir/BL ]; then
   echo "Old blacklist directory found in ${workdir}. Deleted!"
   rm -rf $workdir/blacklists
fi

# copy actual shalla's blacklist
# thanks for the " || exit 1 " hint to Rich Wales
# (-b run in background does not work correctly) -o log to $wgetlog

rm $wgetlogdir/blacklists-wget.log

echo "Updating Squid Blacklists -" $(date -u)

echo "Retrieving blacklists.tar.gz"

wget $blacklists -a $wgetlogdir/blacklists-wget.log -O $workdir/blacklists.tar.gz || { echo "Unable to download blacklists.tar.gz" && exit 1 ; }

echo "Done!"

echo "Unzippping blacklists.tar.gz"

$tarpath xzf $workdir/blacklists.tar.gz -C $workdir || { echo "Unable to extract $workdir/blacklists.tar.gz" && exit 1 ; }

echo "Done!"

# Create diff files for all categories
# Note: There is no reason to use all categories unless this is exactly
#       what you intend to block. Make sure that only the categories you
#       are going to block with squidGuard are listed below.

CATEGORIES="blacklists/adult blacklists/malware blacklists/phishing blacklists/porn"

echo "Creating diff files."

cp -R $workdir/blacklists/adult $dbhome
cp -R $workdir/blacklists/malware $dbhome
cp -R $workdir/blacklists/phishing $dbhome
cp -R $workdir/blacklists/porn $dbhome

echo "Done!"

echo "Setting file permisions."
$chownpath -R $squidGuardowner $dbhome
chmod 755 $dbhome
cd $dbhome
find . -type f -exec chmod 644 {} \;
find . -type d -exec chmod 755 {} \;

echo "Done!"

echo "Updating squid db files. This will take some time, please be patient."
$squidGuardpath -C all

echo "Done!"

echo "Reconfiguring squid."
$squidpath -k reconfigure

echo "Done!"

echo "Clean up downloaded file and directories."
rm $workdir/blacklists.tar.gz
rm -rf $workdir/blacklists

echo "Completed! -" $(date -u)

exit 0
Save and close with ctrl-x y return
Set access permissions
sudo chmod +x /usr/local/bin/blacklist.sh
Now, we need to add a few lines in the Squid config file.
Open the squid.conf file
sudo nano /etc/squid/squid.conf
Add the following at the end
...
url_rewrite_program /usr/bin/squidGuard -c /etc/squidguard/squidGuard.conf
redirect_children 8
redirector_bypass on
redirect_program /usr/bin/squidGuard -c /etc/squidguard/squidGuard.conf
Save and close with ctrl-x y return
We need to install a few more tools before we can run the script and test the blacklists
Reference
http://www.squidguard.org/index.html
http://dsi.ut-capitole.fr/blacklists/index_en.php
http://www.shallalist.de/
Nginx and php7.2-fpm
Install Nginx
sudo apt-get install -t buster nginx-full
Install php7.2-fpm
sudo apt-get install php7.2-fpm
Create a custom file
sudo nano /etc/php/7.2/fpm/conf.d/90-pi-custom.ini
Copy-paste the following
cgi.fix_pathinfo=0

upload_max_filesize=64m
post_max_size=64m
max_execution_time=600
Save and close with ctrl-x y return
Open the www.conf file
sudo nano /etc/php/7.2/fpm/pool.d/www.conf
Make sure the following line is uncommented
listen = /run/php/php7.2-fpm.sock
Save and close with ctrl-x y return
Restart php7.2-fpm
sudo service php7.2-fpm restart
Create a php7.2-fpm.conf in nginx file
sudo nano /etc/nginx/conf.d/php7.2-fpm.conf
Copy-paste the following
upstream php7.2-fpm-sock {
  server unix:/run/php/php7.2-fpm.sock;
}
Save and close with ctrl-x y return
Open the sites-available/default file
sudo nano /etc/nginx/sites-available/default
Modify the configuration as below
server {
listen 80;
root /var/www/html;
index index.php index.html index.htm index.nginx-debian.html adult_block.php block.php;
server_name localhost;

location / {
try_files $uri $uri/ /adult_block.php;
allow 192.168.1.0/24;
allow 127.0.0.1;
deny all;
}

location ~ \.php$ {
try_files $uri $uri/ =404;
fastcgi_index adult_block.php;
fastcgi_pass php7.2-fpm-sock;
fastcgi_param SCRIPT_FILENAME $document_root$fastcgi_script_name;
include /etc/nginx/fastcgi_params;
}

}
Save and close with ctrl-x y return
In case you have apache already installed and running, stop it
sudo /etc/init.d/apache2 stop
Then disable it
sudo systemctl disable apache2
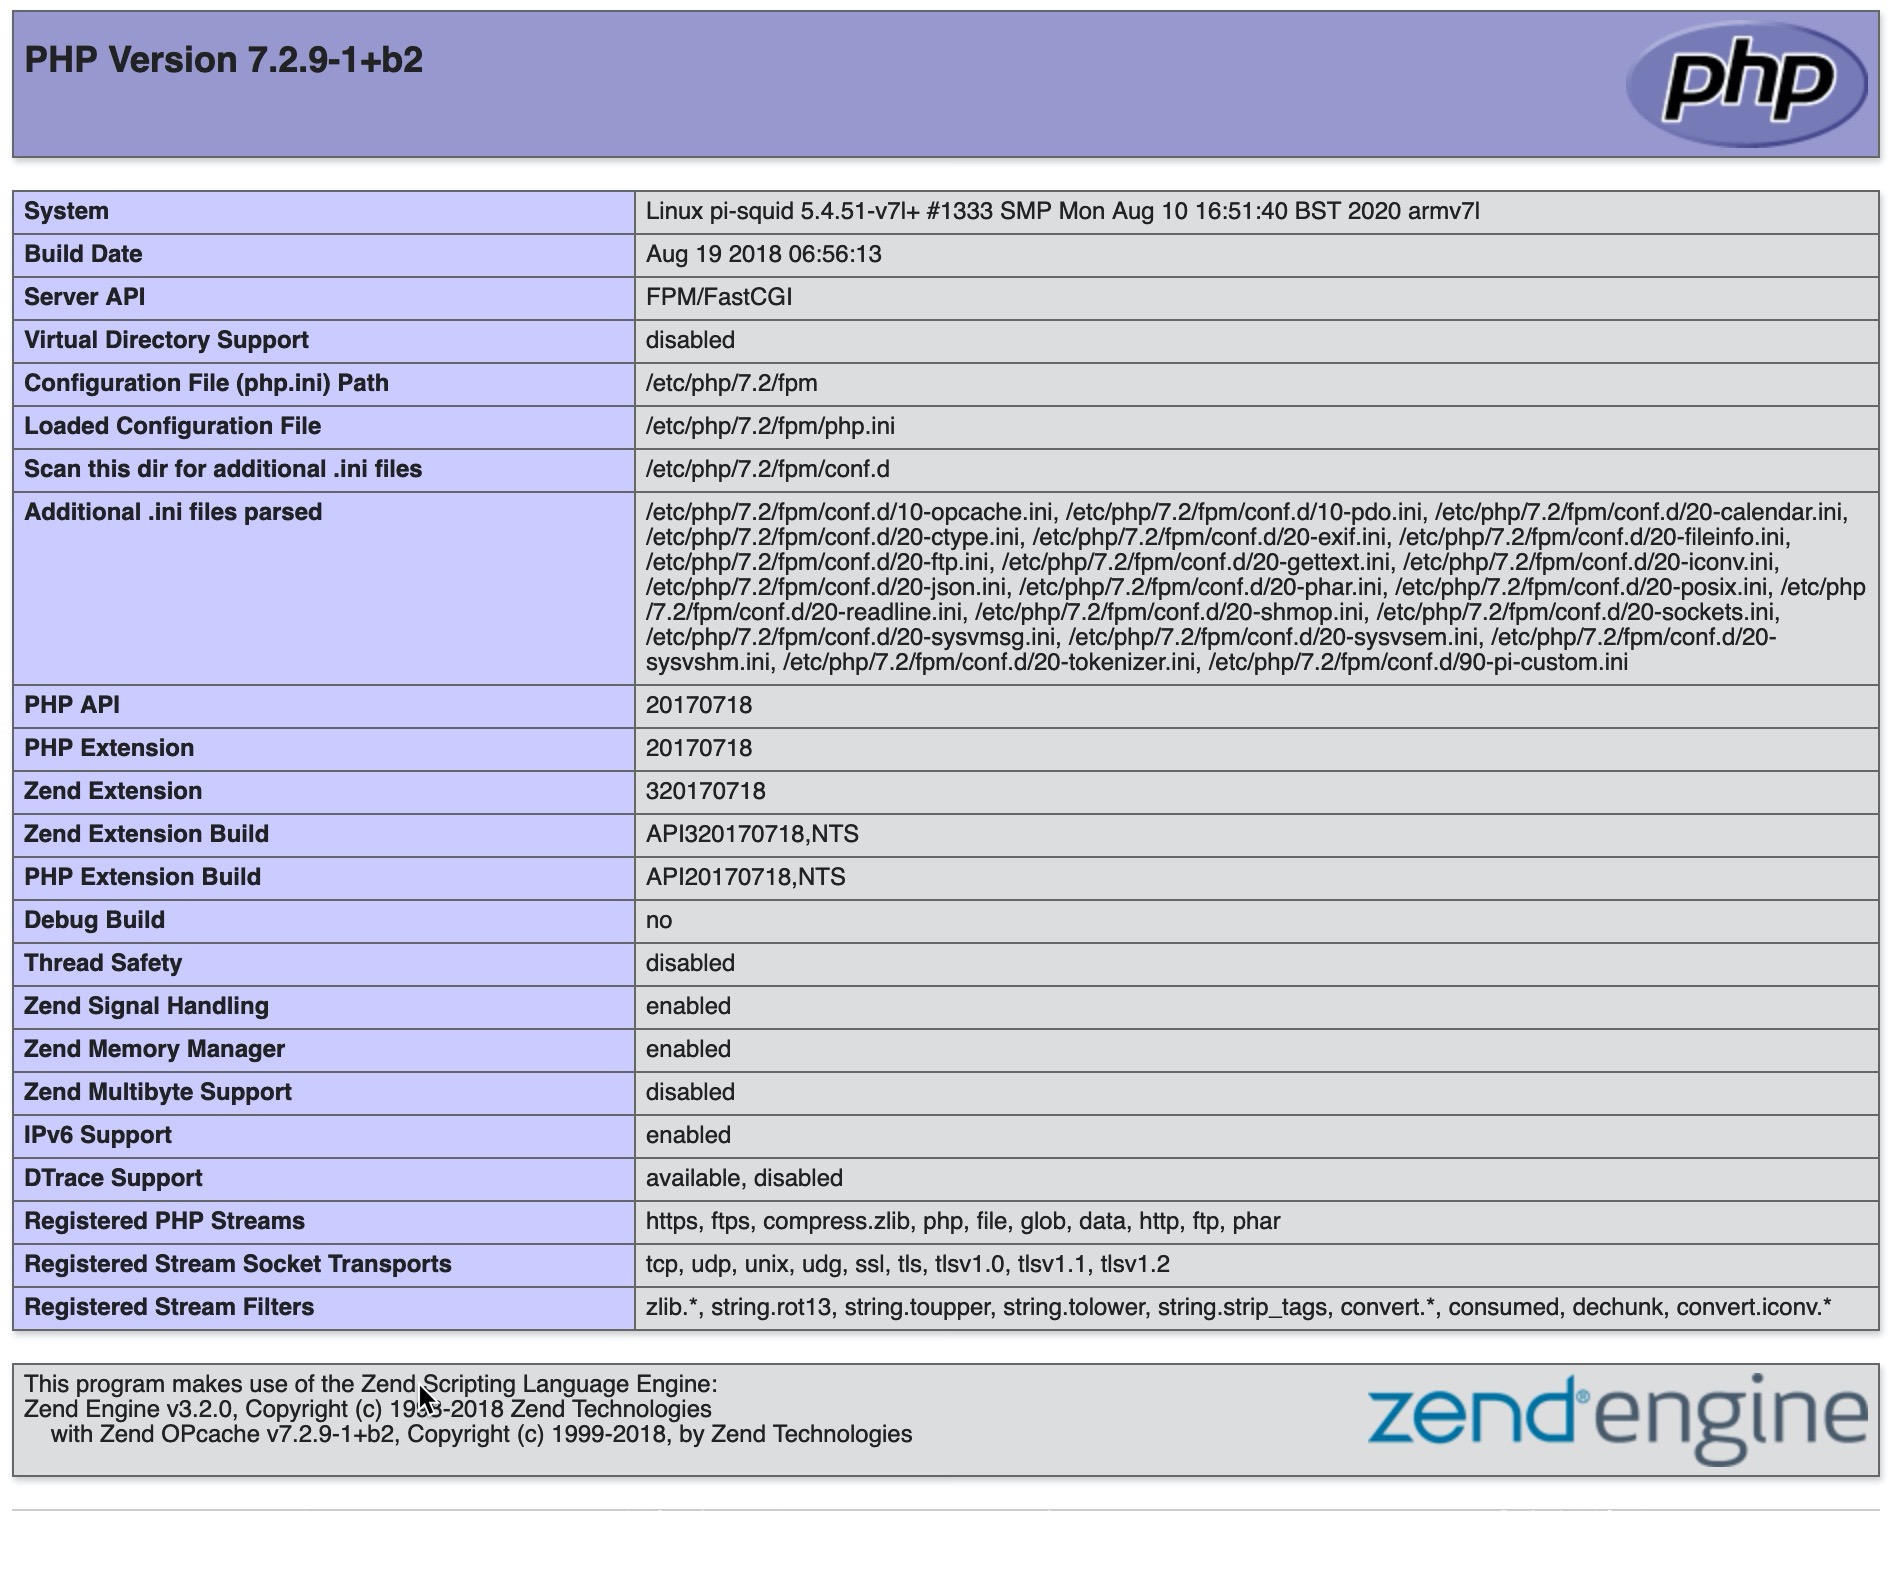
Create a info.php file to check the PHP installation
sudo nano /var/www/html/info.php
Type
<?php phpinfo(); ?>
Save and close with ctrl-x y return
Reboot
sudo reboot
Log in again and test your installation (Nginx and PHP). Adjust the IP address
Check that the Nginx server is running. In your browser’s URL bar, type
You should see the following

Add /info.php
You should see the following
Create the adult_block.php file
sudo nano /var/www/html/adult_block.php
Copy-paste the following, but make sure you have adjusted the two lines below with the correct IP number.
rel="stylesheet" type="text/css" href='http://192.168.1.xxx/adult_filter.css'
...
height=300px src='http://192.168.1.xxx/adult_block.png' />
...
<?php
//if (@$_GET['cname'])        $details[] = "Client Name: {$_GET['cname']}";
if (@$_GET['caddr'])        $details[] = "Client IP: {$_GET['caddr']}";
if (@$_GET['user'])         $details[] = "Client User: {$_GET['user']}";
if (@$_GET['group'])        $details[] = "Group: {$_GET['group']}";
if (@$_GET['target'])       $details[] = "Category: {$_GET['target']}";
if (isset($details) && $details) $details = implode(" | ", $details);
?>

<!DOCTYPE html PUBLIC "-//W3C//DTD HTML 4.01 Transitional//EN" "http://www.w3.org/TR/html4/loose.dtd">
<html>
    <head>
        <meta http-equiv="Content-Type" content="text/html; charset=utf8" />
        <title>Site Web bloqué</title>
        <link rel="stylesheet" type="text/css" href='http://192.168.1.xxx/adult_filter.css'>

    </head>
    <body>
        <div id="message">
            <center><img height=300px src='http://192.168.1.xxx/adult_block.png' /></center>
        </div>
        <div class="outer">
           <div class="header">
           Contrôle parental activé
           </div>
           <div class="inner">
              <div class="error">
                 <p>
                 Accès refusé !
                 </p>
              </div>
              <div class="msg">
                 <p>
                    Site Web bloqué
                 </p>
                 <p>
                    <strong>URL: <?php printf("<a href=\"%s\">%s</a>", @$_GET['url'], @$_GET['url']);?></strong>
                 </p>
                 <p><?php if (isset($details) && $details) print $details; ?></p>
              </div>
           </div>
           <div class="footer">
              Web Filtering by Squid3 and SquidGuard
           </div>
        </div>
    </body>
</html>
Save and close with ctrl-x y return
In addition, download this image “adult_block.png” and put it in your root folder (var/www/html). You can of course replace the image by anything else of your choosing.
Create the adult_filter.css file
sudo nano /var/www/html/adult_filter.css
Copy-paste the following
@CHARSET "UTF-8";

body {
 background-color: #ffffff;
 font-family: verdana, arial, sans serif;
}

div.outer {
 width: 70%;
 margin: 20px auto;
}

div.header {
 padding: 10px;
 background-color: #c0c0c0;
 text-align: right;
 font-size: 60%;
}

div.footer {
 padding: 5px;
 background-color: #c0c0c0;
 text-align: right;
 font-size: 60%;
}

div.inner {
 text-align: center;
 background-color: #f4f4f4;
 text-align: center;
 padding: 20px;
}

div.msg {
 padding: 20px;
 margin-top: 20px;
 background-color: #e2e2e2;
 color: black;
 font-size: 80%;
}

div.error {
 letter-spacing: 0.5em;
 word-spacing: 1em;
 padding: 20px;
 background-color: #b22222;
 color: white;
 font-size: 200%;
 font-weight: bold;
}
Save and close with ctrl-x y return
Test it!
Now is time to run the blacklist script and test our configuration. Installing the blacklists will take some time, be patient.
sudo bash /usr/local/bin/blacklist.sh
If you see the error message below, just run the script again to make sure the blaklists are installed properly. The second time it will disappear.
rm: cannot remove '/var/log/squidguard/blacklists-wget.log': No such file or directory
Use Crontab to run the script automatically every day or week as prefered.
Try to access some adult content websites. When a website (HTTP) is blocked by the Adult blocklist, the user will be redirected to the block page (adult_block.php).
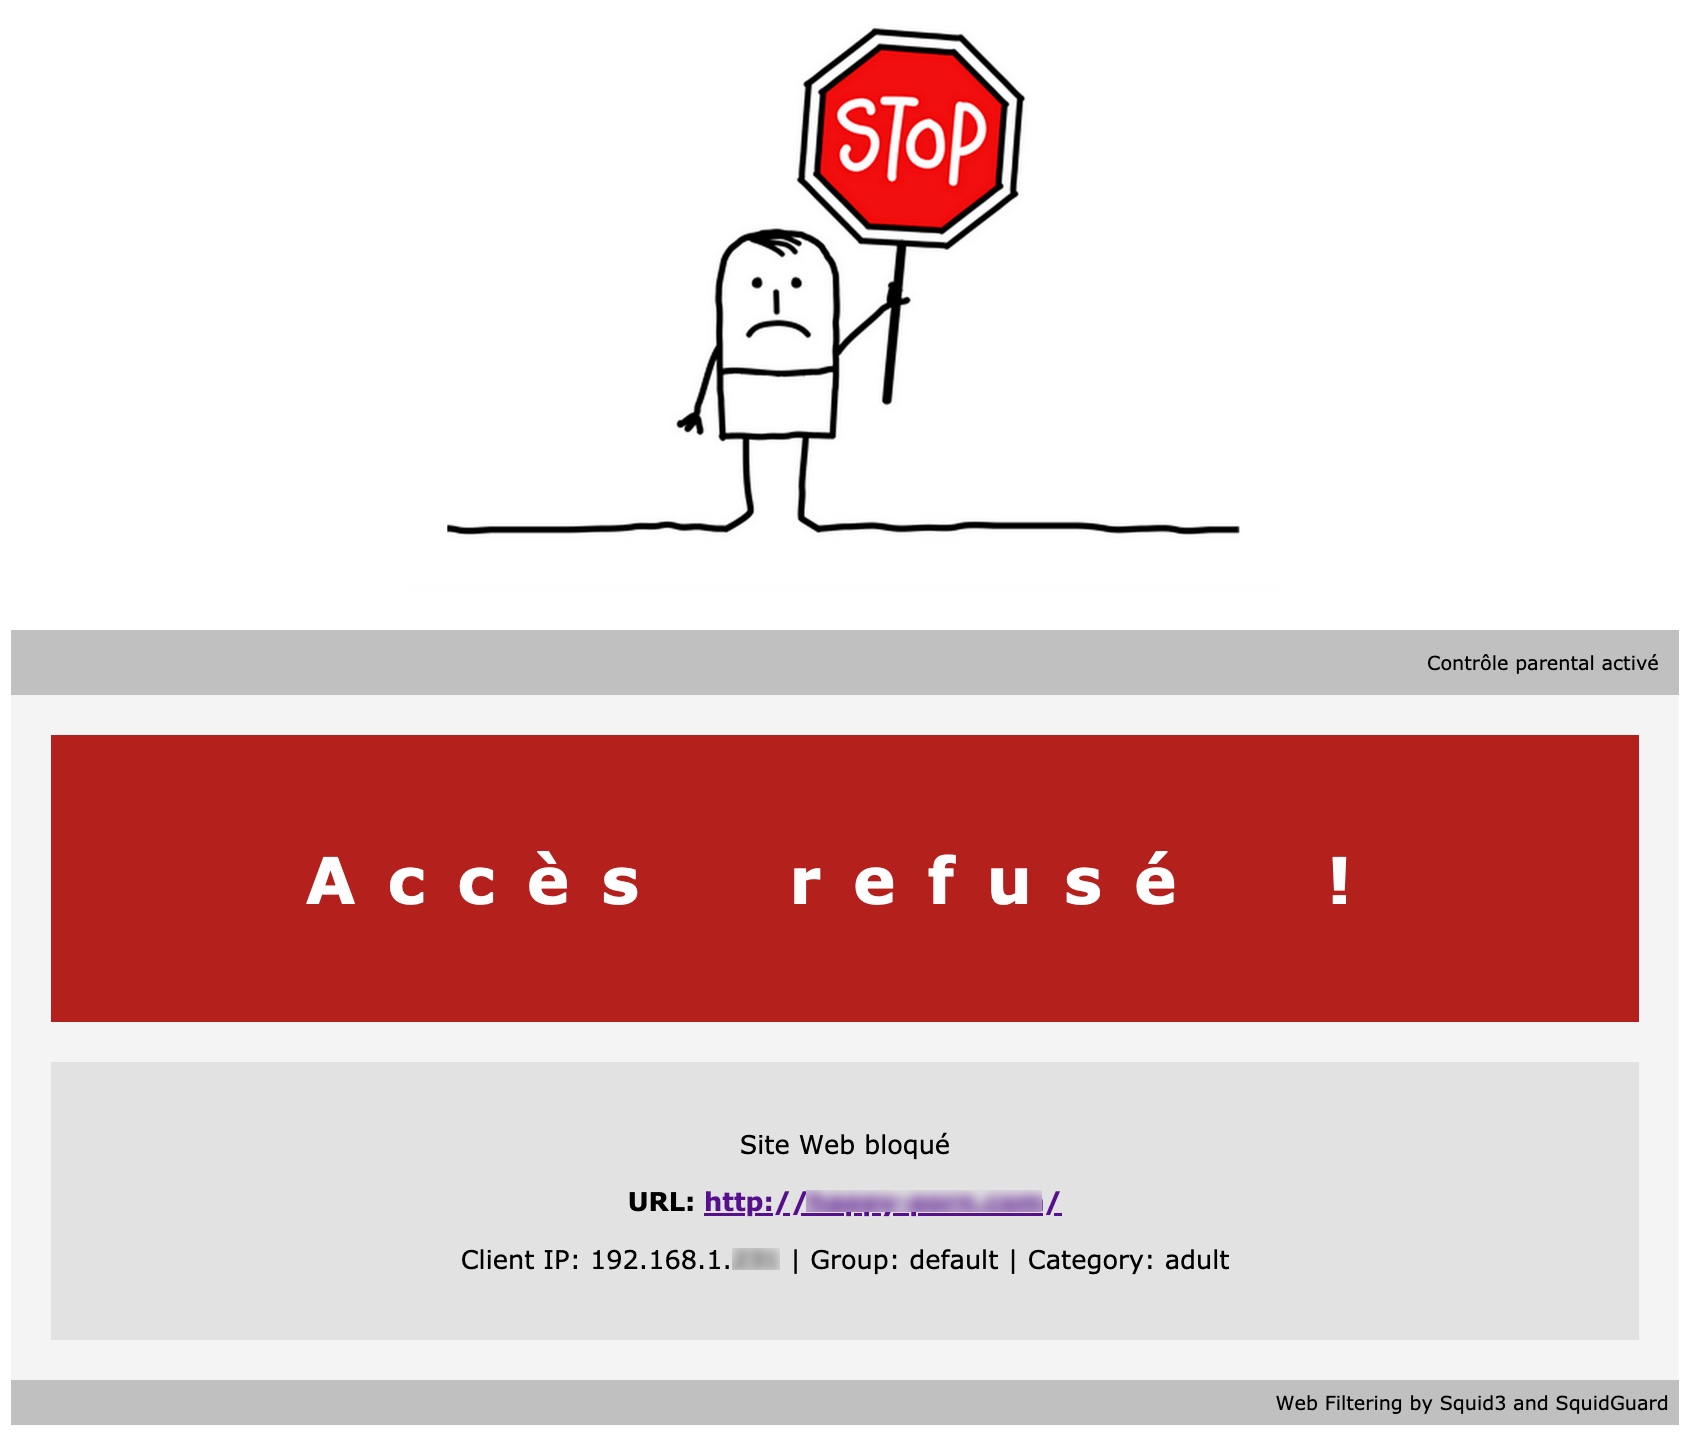
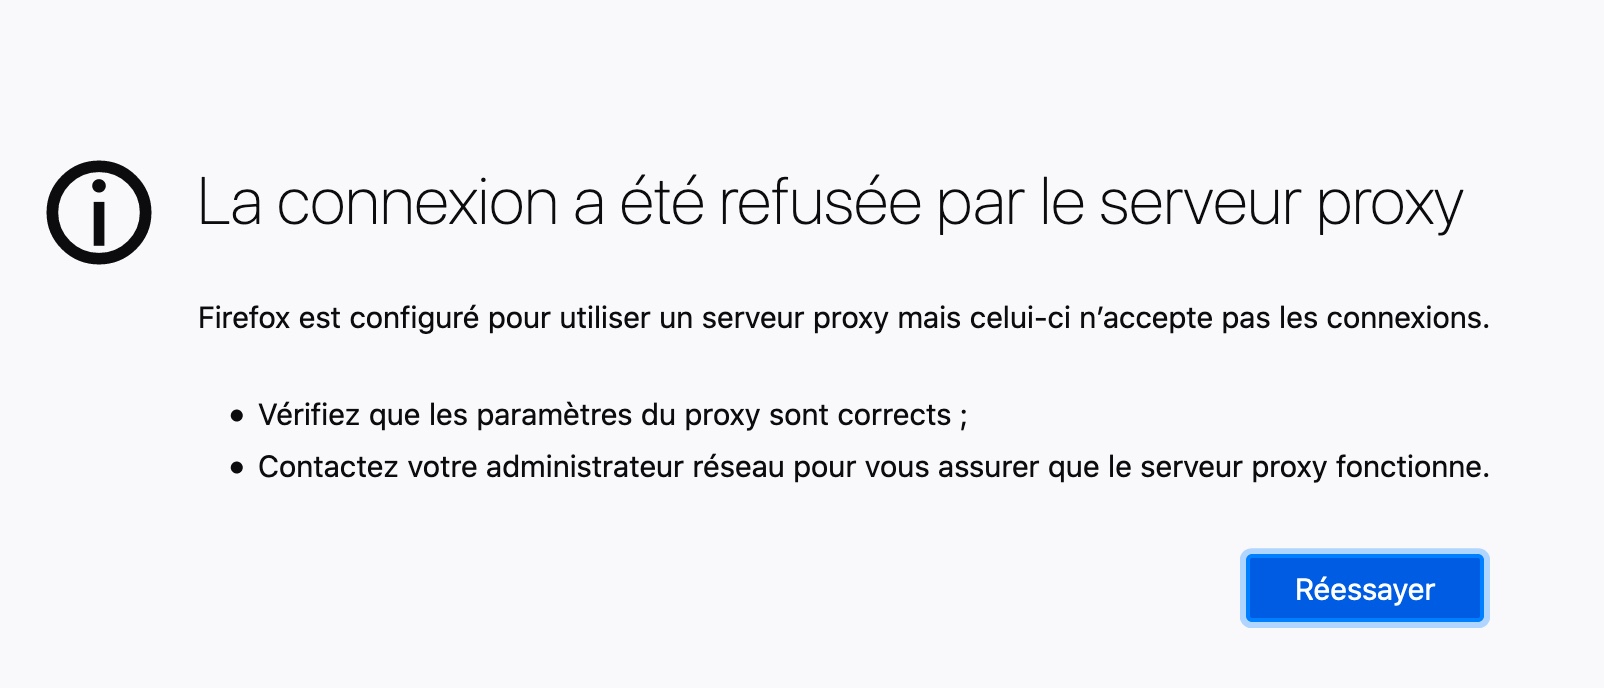
When a website (HTTPS) is blocked by the Adult blocklist, the user will see a warning page.
Remember!A filter based on URL or domains will never be 100% accurate. Expect some sites not to be filtered.
Reference
https://www.loutor.org/2017/03/29/mettre-en-place-une-protection-parentale-pour-la-famille/
Clamav
Here, we will install an antivirus engine to scan the device for trojans, viruses, malware, and other malicious threats, but also to scan threats coming from the Internet (this works on HTTP connections only)
Install Clamav and clamav-daemon
sudo apt-get install clamav clamav-daemon
Run freshclam
sudo freshclam
The freshclam command should return
Sun Sep 27 11:23:29 2020 -> ClamAV update process started at Sun Sep 27 11:23:29 2020
Sun Sep 27 11:23:29 2020 -> daily.cvd database is up to date (version: 25939, sigs: 4323423, f-level: 63, builder: raynman)
Sun Sep 27 11:23:29 2020 -> main.cvd database is up to date (version: 59, sigs: 4564902, f-level: 60, builder: sigmgr)
Sun Sep 27 11:23:29 2020 -> bytecode.cvd database is up to date (version: 331, sigs: 94, f-level: 63, builder: anvilleg)
If the freshclam command returns the following error message
ERROR: /var/log/clamav/freshclam.log is locked by another process
ERROR: Problem with internal logger (UpdateLogFile = /var/log/clamav/freshclam.log).
ERROR: initialize: libfreshclam init failed.
ERROR: Initialization error!
Stop clamav-freshclam
sudo service clamav-freshclam stop
Run the command again
sudo freshclam
Restart clamav-freshclam
sudo service clamav-freshclam start
Check the status with the command below. You should see Active: active (running)
sudo systemctl status clamav-daemon.service
Reference
https://pimylifeup.com/raspberry-pi-clamav/
SquidClamav
Install some dependency first
sudo apt-get install gcc make curl libcurl4-gnutls-dev c-icap libicapapi-dev libssl-dev
Download the SquidClamav .tar.gz archive file (check for the latest)
sudo wget https://sourceforge.net/projects/squidclamav/files/squidclamav/7.1/squidclamav-7.1.tar.gz/download -O squidclamav-7.1.tar.gz
Build the tool with the following commands (one by one)
tar zxvf squidclamav-7.1.tar.gz
cd squidclamav-7.1
./configure --with-c-icap
sudo make
sudo make install
cd
Create a symbolic link
sudo ln -s /etc/c-icap/squidclamav.conf /etc/squidclamav.conf
Open the c-icap file
sudo nano /etc/default/c-icap
Make sure Start is set to “yes”
START=yes
Make a backup copy of the configuration file
sudo cp /etc/c-icap/c-icap.conf /etc/c-icap/c-icap.conf.bkp
This step is optional, it removes all the lines in the config file that starts with #.
sudo su

cat /etc/c-icap/c-icap.conf.bkp | egrep -v -e '^[[:blank:]]*#|^$' > /etc/c-icap/c-icap.conf

exit
Open the c-icap.conf file
sudo nano /etc/c-icap/c-icap.conf
Add this line at the end
Service squidclamav squidclamav.so
Save and close with ctrl-x y return
Now, we need to add some information on the squid.conf file that we saw in step 3 above
Open the squid.conf file
sudo nano /etc/squid/squid.conf
Add at the end of the file the following lines. Make sure you have adjusted the IP address as needed
icap_service service_req reqmod_precache bypass=1 icap://192.168.1.xxx:1344/squidclamav
icap_service service_resp respmod_precache bypass=1 icap://192.168.1.xxx:1344/squidclamav
...
icap_enable on
icap_send_client_ip on
icap_send_client_username on
icap_client_username_encode off
icap_client_username_header X-Authenticated-User
icap_preview_enable on
icap_preview_size 1024

icap_service service_req reqmod_precache bypass=1 icap://192.168.1.xxx:1344/squidclamav
icap_service service_resp respmod_precache bypass=1 icap://192.168.1.xxx:1344/squidclamav

adaptation_access service_req allow all
adaptation_access service_resp allow all
Save and close with ctrl-x y return
Now, the full squid.conf file should look like this
visible_hostname squid.proxy.org

acl localnet src 192.168.1.0/24  # Home network

acl SSL_ports port 443
acl Safe_ports port 80     # http
acl Safe_ports port 21     # ftp
acl Safe_ports port 443    # https
acl Safe_ports port 70     # gopher
acl Safe_ports port 210    # wais
acl Safe_ports port 1025-65535   # unregistered ports
acl Safe_ports port 280    # http-mgmt
acl Safe_ports port 488    # gss-http
acl Safe_ports port 591    # filemaker
acl Safe_ports port 777    # multiling http
acl Safe_ports port 873          # rsync

acl CONNECT method CONNECT

http_access deny !Safe_ports
http_access deny CONNECT !SSL_ports
http_access allow localhost manager
http_access deny manager
http_access allow localnet
http_access allow localhost
http_access deny all

http_port 3128

cache_mem 512 MB
maximum_object_size_in_memory 1024 KB
minimum_object_size 0 KB
maximum_object_size 96 MB
memory_cache_mode always

cache_dir ufs /var/spool/squid 4096 16 256
coredump_dir /var/spool/squid

refresh_pattern ^ftp: 1440 20% 10080
refresh_pattern ^gopher: 1440 0% 1440
refresh_pattern -i \.(gif|png|jpg|jpeg|ico)$ 10080 90% 43200 override-expire ignore-no-cache ignore-no-store ignore-private
refresh_pattern -i \.(iso|avi|wav|mp3|mp4|mpeg|swf|flv|x-flv)$ 43200 90% 432000 override-expire ignore-no-cache ignore-no-store ignore-private
refresh_pattern -i \.(deb|rpm|exe|zip|tar|tgz|ram|rar|bin|ppt|doc|tiff)$ 10080 90% 43200 override-expire ignore-no-cache ignore-no-store ignore-private
refresh_pattern -i \.index.(html|htm)$ 0 40% 10080
refresh_pattern -i \.(html|htm|css|js)$ 1440 40% 40320
refresh_pattern . 0 40% 40320

cache_peer 192.168.1.xxx parent 8118 0 default no-query no-digest
acl ftp proto FTP
always_direct allow ftp
never_direct allow all
cache_effective_group proxy

url_rewrite_program /usr/bin/squidGuard -c /etc/squidguard/squidGuard.conf
redirect_children 8
redirector_bypass on
redirect_program /usr/bin/squidGuard -c /etc/squidguard/squidGuard.conf

icap_enable on
icap_send_client_ip on
icap_send_client_username on
icap_client_username_encode off
icap_client_username_header X-Authenticated-User
icap_preview_enable on
icap_preview_size 1024

icap_service service_req reqmod_precache bypass=1 icap://192.168.1.xxx:1344/squidclamav
icap_service service_resp respmod_precache bypass=1 icap://192.168.1.xxx:1344/squidclamav

adaptation_access service_req allow all
adaptation_access service_resp allow all
Make a backup copy of the squidclamav.conf configuration file
sudo cp /etc/c-icap/squidclamav.conf /etc/c-icap/squidclamav.conf.bkp
This step is optional, it removes all the lines in the config file that starts with #.
sudo su

cat /etc/c-icap/squidclamav.conf.bkp | egrep -v -e '^[[:blank:]]*#|^$' > /etc/c-icap/squidclamav.conf

exit
Open the squidclamav.conf file
sudo nano /etc/c-icap/squidclamav.conf
Adjust as follows. Make sure you have adjusted the IP address as needed in the following two lines
clamd_ip 192.168.1.xxx,127.0.0.1
...
# When a virus is found then redirect the user to this URL redirect http://192.168.1.xxx/block.php
maxsize 5000000
clamd_local /var/run/clamav/clamd.ctl
clamd_ip 192.168.1.xxx,127.0.0.1
clamd_port 3310
timeout 1
logredir 0
dnslookup 1
safebrowsing 0

# When a virus is found then redirect the user to this URL
redirect http://192.168.1.xxx/block.php
Create the block.php page
sudo nano /var/www/html/block.php
Copy-paste the following or download the script here. Make sure you have adjusted these two lines
$to='me@gmail.com';
$from='Security Alerts <system_hostname>';
...
<?php
/*
	squid_clwarn.php
	part of pfSense (https://www.pfSense.org/)
	Copyright (C) 2015 Marcello Coutinho
	Copyright (C) 2015 ESF, LLC
	All rights reserved.
	Redistribution and use in source and binary forms, with or without
	modification, are permitted provided that the following conditions are met:
	1. Redistributions of source code must retain the above copyright notice,
	   this list of conditions and the following disclaimer.
	2. Redistributions in binary form must reproduce the above copyright
	   notice, this list of conditions and the following disclaimer in the
	   documentation and/or other materials provided with the distribution.
	THIS SOFTWARE IS PROVIDED ``AS IS'' AND ANY EXPRESS OR IMPLIED WARRANTIES,
	INCLUDING, BUT NOT LIMITED TO, THE IMPLIED WARRANTIES OF MERCHANTABILITY
	AND FITNESS FOR A PARTICULAR PURPOSE ARE DISCLAIMED. IN NO EVENT SHALL THE
	AUTHOR BE LIABLE FOR ANY DIRECT, INDIRECT, INCIDENTAL, SPECIAL, EXEMPLARY,
	OR CONSEQUENTIAL DAMAGES (INCLUDING, BUT NOT LIMITED TO, PROCUREMENT OF
	SUBSTITUTE GOODS OR SERVICES; LOSS OF USE, DATA, OR PROFITS; OR BUSINESS
	INTERRUPTION) HOWEVER CAUSED AND ON ANY THEORY OF LIABILITY, WHETHER IN
	CONTRACT, STRICT LIABILITY, OR TORT (INCLUDING NEGLIGENCE OR OTHERWISE)
	ARISING IN ANY WAY OUT OF THE USE OF THIS SOFTWARE, EVEN IF ADVISED OF THE
	POSSIBILITY OF SUCH DAMAGE.
*/

# send a notice to the admin
$to='me@yahoo.fr';
$from='Security Alerts <pi-squid>';
$subj="ALERT: Attempt to Download Malware by $fromhost";

$VERSION = '6.10';
$url = $_REQUEST['url'];
$virus = ($_REQUEST['virus'] ? $_REQUEST['virus'] : $_REQUEST['malware']);
$source = preg_replace("@/-@", "", $_REQUEST['source']);
$user = $_REQUEST['user'];

$TITLE_VIRUS = "SquidClamav $VERSION: Virus detected!";
$subtitle = 'Virus name';
$errorreturn = 'This file cannot be downloaded.';
$urlerror = 'contains a virus';
if (preg_match("/Safebrowsing/", $virus)) {
	$TITLE_VIRUS = "SquidClamav $VERSION: Unsafe Browsing detected";
	$subtitle = 'Malware / phishing type';
	$urlerror = 'is listed as suspicious';
	$errorreturn = 'This page cannot be displayed';
}

// Remove clamd infos
$vp[0]="/stream: /";
$vp[1]="/ FOUND/";
$vr[0]="";
$vr[1]="";

$virus = preg_replace($vp, $vr, $virus);
error_log(date("Y-m-d H:i:s") . " | VIRUS FOUND | " . $virus . " | " . $url . " | " . $source . " | " . $user . "\n", 3, "/var/log/c-icap/virus.log");

?>
<style type="text/css">
	.visu {
	border:1px solid #C0C0C0;
	color:#FFFFFF;
	position: relative;
	min-width: 13em;
	max-width: 52em;
	margin: 4em auto;
	border: 1px solid ThreeDShadow;
	border-radius: 10px;
	padding: 3em;
	-moz-padding-start: 30px;
	background-color: #8b0000;
}
.visu h2, .visu h3, .visu h4 {
	font-size:130%;
	font-family:"times new roman", times, serif;
	font-style:normal;
	font-weight:bolder;
}
</style>
<div class="visu">
	<h2><?=$TITLE_VIRUS?></h2>
	<hr />
	<p>
	The requested URL <?=$url?> <?=$urlerror?><br/>
	<?=$subtitle?>: <?=$virus?>
	</p><p>
	<?=$errorreturn?>
	</p><p>
	Origin: <?=$source?> / <?=$user?>
	</p><p>
	<hr />
	<font color="blue"> Powered by <a href="http://squidclamav.darold.net/">SquidClamav <?=$VERSION?></a>.</font>
	</p>
</div>
Restart squid, c-icap and clamav-daemon
sudo /etc/init.d/squid restart
sudo /etc/init.d/c-icap restart
sudo /etc/init.d/clamav-daemon restart
Test it!
Try to download the EICAR test virus signature by clicking this link
http://proxy.opendnstest.com/download/eicar.com/
Your browser should display the block.php page
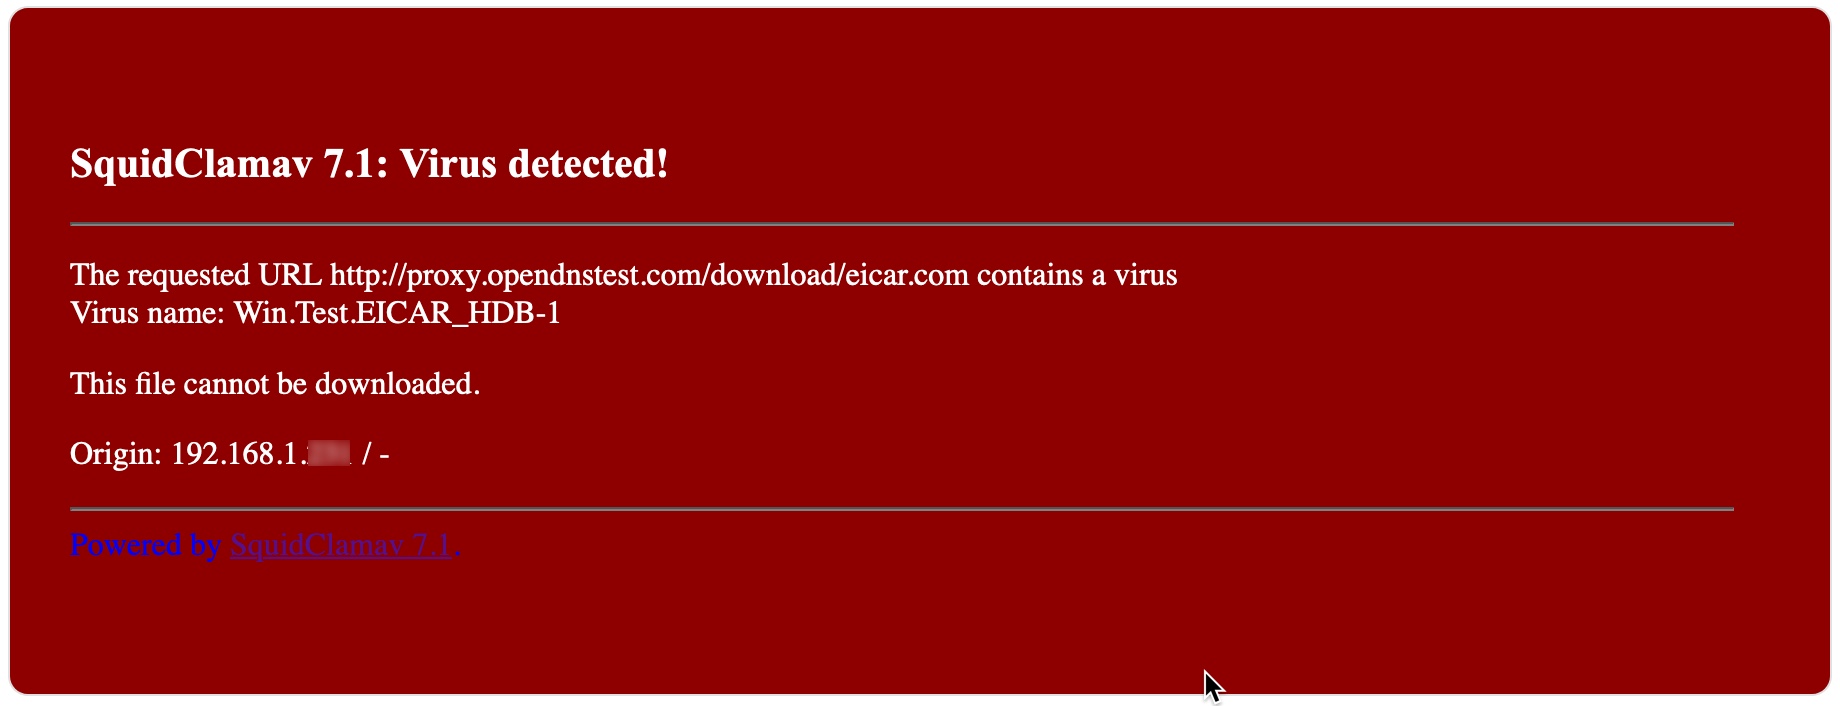
Note that this will only work with HTTP unsecured addresses. If you want this to work with HTTPS, see the Wireless Access Point with transparent Squid and SquidGuard proxy project
Reference
https://blog.razorbreak.com/2016/12/12/un-calamar-dans-mon-serveur/
http://squidclamav.darold.net/
https://github.com/pfsense/pfsense-packages/blob/master/config/squid3/34/squid_clwarn.php
https://www.eicar.org/
Part 3: Other programs to install (optional)
Danted
Install Danted
sudo apt-get install dante-server
Check that it has started up correctly. The status output should show: Active: active (running).
sudo service danted status
If it failed to start with the error below
...
Active: failed (Result: exit-code) since Sat 2020-09-26 10:32:00 BST; 37s ago
...
Sep 26 10:32:00 pi-squid systemd[2315]: danted.service: Failed to set up mount namespacing: No such file or directory
Sep 26 10:32:00 pi-squid systemd[2315]: danted.service: Failed at step NAMESPACE spawning /bin/sh: No such file or directory
...
Sep 26 10:32:00 pi-squid systemd[1]: Failed to start SOCKS (v4 and v5) proxy daemon (danted).
...
Open the dante.service file
sudo nano /lib/systemd/system/danted.service
Find
ReadOnlyDirectories=/bin /etc /lib /lib64 /sbin /usr /var
Remove /lib64
ReadOnlyDirectories=/bin /etc /lib /sbin /usr /var
Reload the Danted daemon
sudo systemctl daemon-reload
Restart Danted
sudo /etc/init.d/danted restart
Check again that it has started up correctly. The status output should show: Active: active (running).
sudo service danted status
Make a backup copy of the configuration file
sudo cp /etc/danted.conf /etc/danted.conf.bkp
This step is optional, it removes all the lines in the config file that starts with #.
sudo su

cat /etc/danted.conf.bkp | egrep -v -e '^[[:blank:]]*#|^$' > /etc/danted.conf

exit
Open the configuration file
sudo nano /etc/danted.conf
Modify the configuration as below
logoutput: syslog

internal: 0.0.0.0 port = 1080
#internal: 192.168.1.xxx port = 1080

external: eth0

socksmethod: none
clientmethod: none

user.privileged: proxy
user.notprivileged: nobody
user.libwrap: nobody

# Allow localhost (stunnel) connections
client pass {
from: 192.168.1.0/24 to: 192.168.1.0/24
log: connect error
}

# Block and log the rest of connection attempts
client block {
from: 0.0.0.0/0 to: 0.0.0.0/0
log: connect error
}

# Blocking clients access to the localhost services
socks block {
from: 0.0.0.0/0 to: lo
log: connect error
}

# Allow clients access to the outside - tcp using "connect" method
socks pass {
from: 192.168.1.0/24 to: 0.0.0.0/0
command: connect
#protocol: tcp udp
protocol: tcp
log: connect error
}

# Block and log all other clients attempts
socks block {
from: 0.0.0.0/0 to: 0.0.0.0/0
log: connect error
}
Now, we need to add one line to the privoxy.conf file
sudo nano /etc/privoxy/config
Add this line at the end of the file. Adjust the IP address as needed
forward-socks5 / 192.168.1.xxx:1080 .
Restart Danted
sudo /etc/init.d/danted restart
Test it!
Type (adjust the IP address)
curl -x socks5h://192.168.1.xxx:1080 ifconfig.co
or
curl --proxy socks5h://192.168.1.xxx:1080 https://api.ipify.org/
If all goes well, you should see your public IPv4 address
Reference
http://www.inet.no/dante/
https://hamy.io/post/0014/setting-up-an-encrypted-socks-proxy-using-dante-and-stunnel/#gsc.tab=0
UFW
Install UFW
sudo apt-get install ufw
Allow all ports from your local network
sudo ufw allow from 192.168.1.0/24
Enable UFW
sudo ufw enable
Check that it is enabled
sudo ufw status verbose
Add other rules as needed
Watchdog
Install Watchdog
sudo apt-get install watchdog
Open the watchdog.conf file
sudo nano /etc/watchdog.conf
This is my configuration
#ping     = 192.168.1.1
#ping     = 172.26.1.255
#interface    = eth0
#file     = /var/log/messages
#change     = 1407

# Uncomment to enable test. Setting one of these values to '0' disables it.
# These values will hopefully never reboot your machine during normal use
# (if your machine is really hung, the loadavg will go much higher than 25)
max-load-1    = 24
max-load-5    = 18
max-load-15   = 12

# Note that this is the number of pages!
# To get the real size, check how large the pagesize is on your machine.
#min-memory   = 1
#allocatable-memory = 1

#repair-binary    = /usr/sbin/repair
#repair-timeout   = 60
#test-binary    =
#test-timeout   = 60

# The retry-timeout and repair limit are used to handle errors in a more robust
# manner. Errors must persist for longer than retry-timeout to action a repair
# or reboot, and if repair-maximum attempts are made without the test passing a
# reboot is initiated anyway.
#retry-timeout    = 60
#repair-maximum   = 1

watchdog-device = /dev/watchdog

# Defaults compiled into the binary
#temperature-sensor =
max-temperature = 80

# Defaults compiled into the binary
admin      = me@yahoo.fr
interval    = 10
#logtick                = 1
#log-dir    = /var/log/watchdog

# This greatly decreases the chance that watchdog won't be scheduled before
# your machine is really loaded
realtime    = yes
priority    = 1

# Check if rsyslogd is still running by enabling the following line
#pidfile   = /var/run/rsyslogd.pid
Test it!
Copy-paste the code below to run a fork bomb on your shell.
WARNING Running this code will render your Raspberry Pi unaccessible until it’s reset by the watchdog.
sudo bash -c ':(){ :|:& };:'
Reference
https://www.domoticz.com/wiki/Setting_up_the_raspberry_pi_watchdog
Webmin
Install Webmin and dependencies
sudo apt-get -y install libnet-ssleay-perl libauthen-pam-perl libio-pty-perl apt-show-versions samba webalizer locate mariadb-server-10.0 squid-cgi
Create a new directory named installed-packagesat the root
sudo mkdir installed-packages
Type
cd installed-packages
Download the latest package
sudo wget http://www.webmin.com/download/deb/webmin-current.deb
Install
sudo dpkg -i webmin-current.deb

cd
We need to add one line in the squid.conf file to authorise communication to port 10000 (webmin’s default port).
Open the squid.conf file
sudo nano /etc/squid/squid.conf
Add the line below after the acl Safe_ports section
acl SSL_ports port 10000 # Webmin
Like this
...
acl SSL_ports port 443
acl Safe_ports port 80           # http
acl Safe_ports port 21           # ftp
acl Safe_ports port 443          # https
acl Safe_ports port 70           # gopher
acl Safe_ports port 210          # wais
acl Safe_ports port 1025-65535   # unregistered ports
acl Safe_ports port 280          # http-mgmt
acl Safe_ports port 488          # gss-http
acl Safe_ports port 591          # filemaker
acl Safe_ports port 777          # multiling http
acl Safe_ports port 873          # rsync
acl SSL_ports port 10000         # Webmin
...
Restart Squid
sudo service squid restart
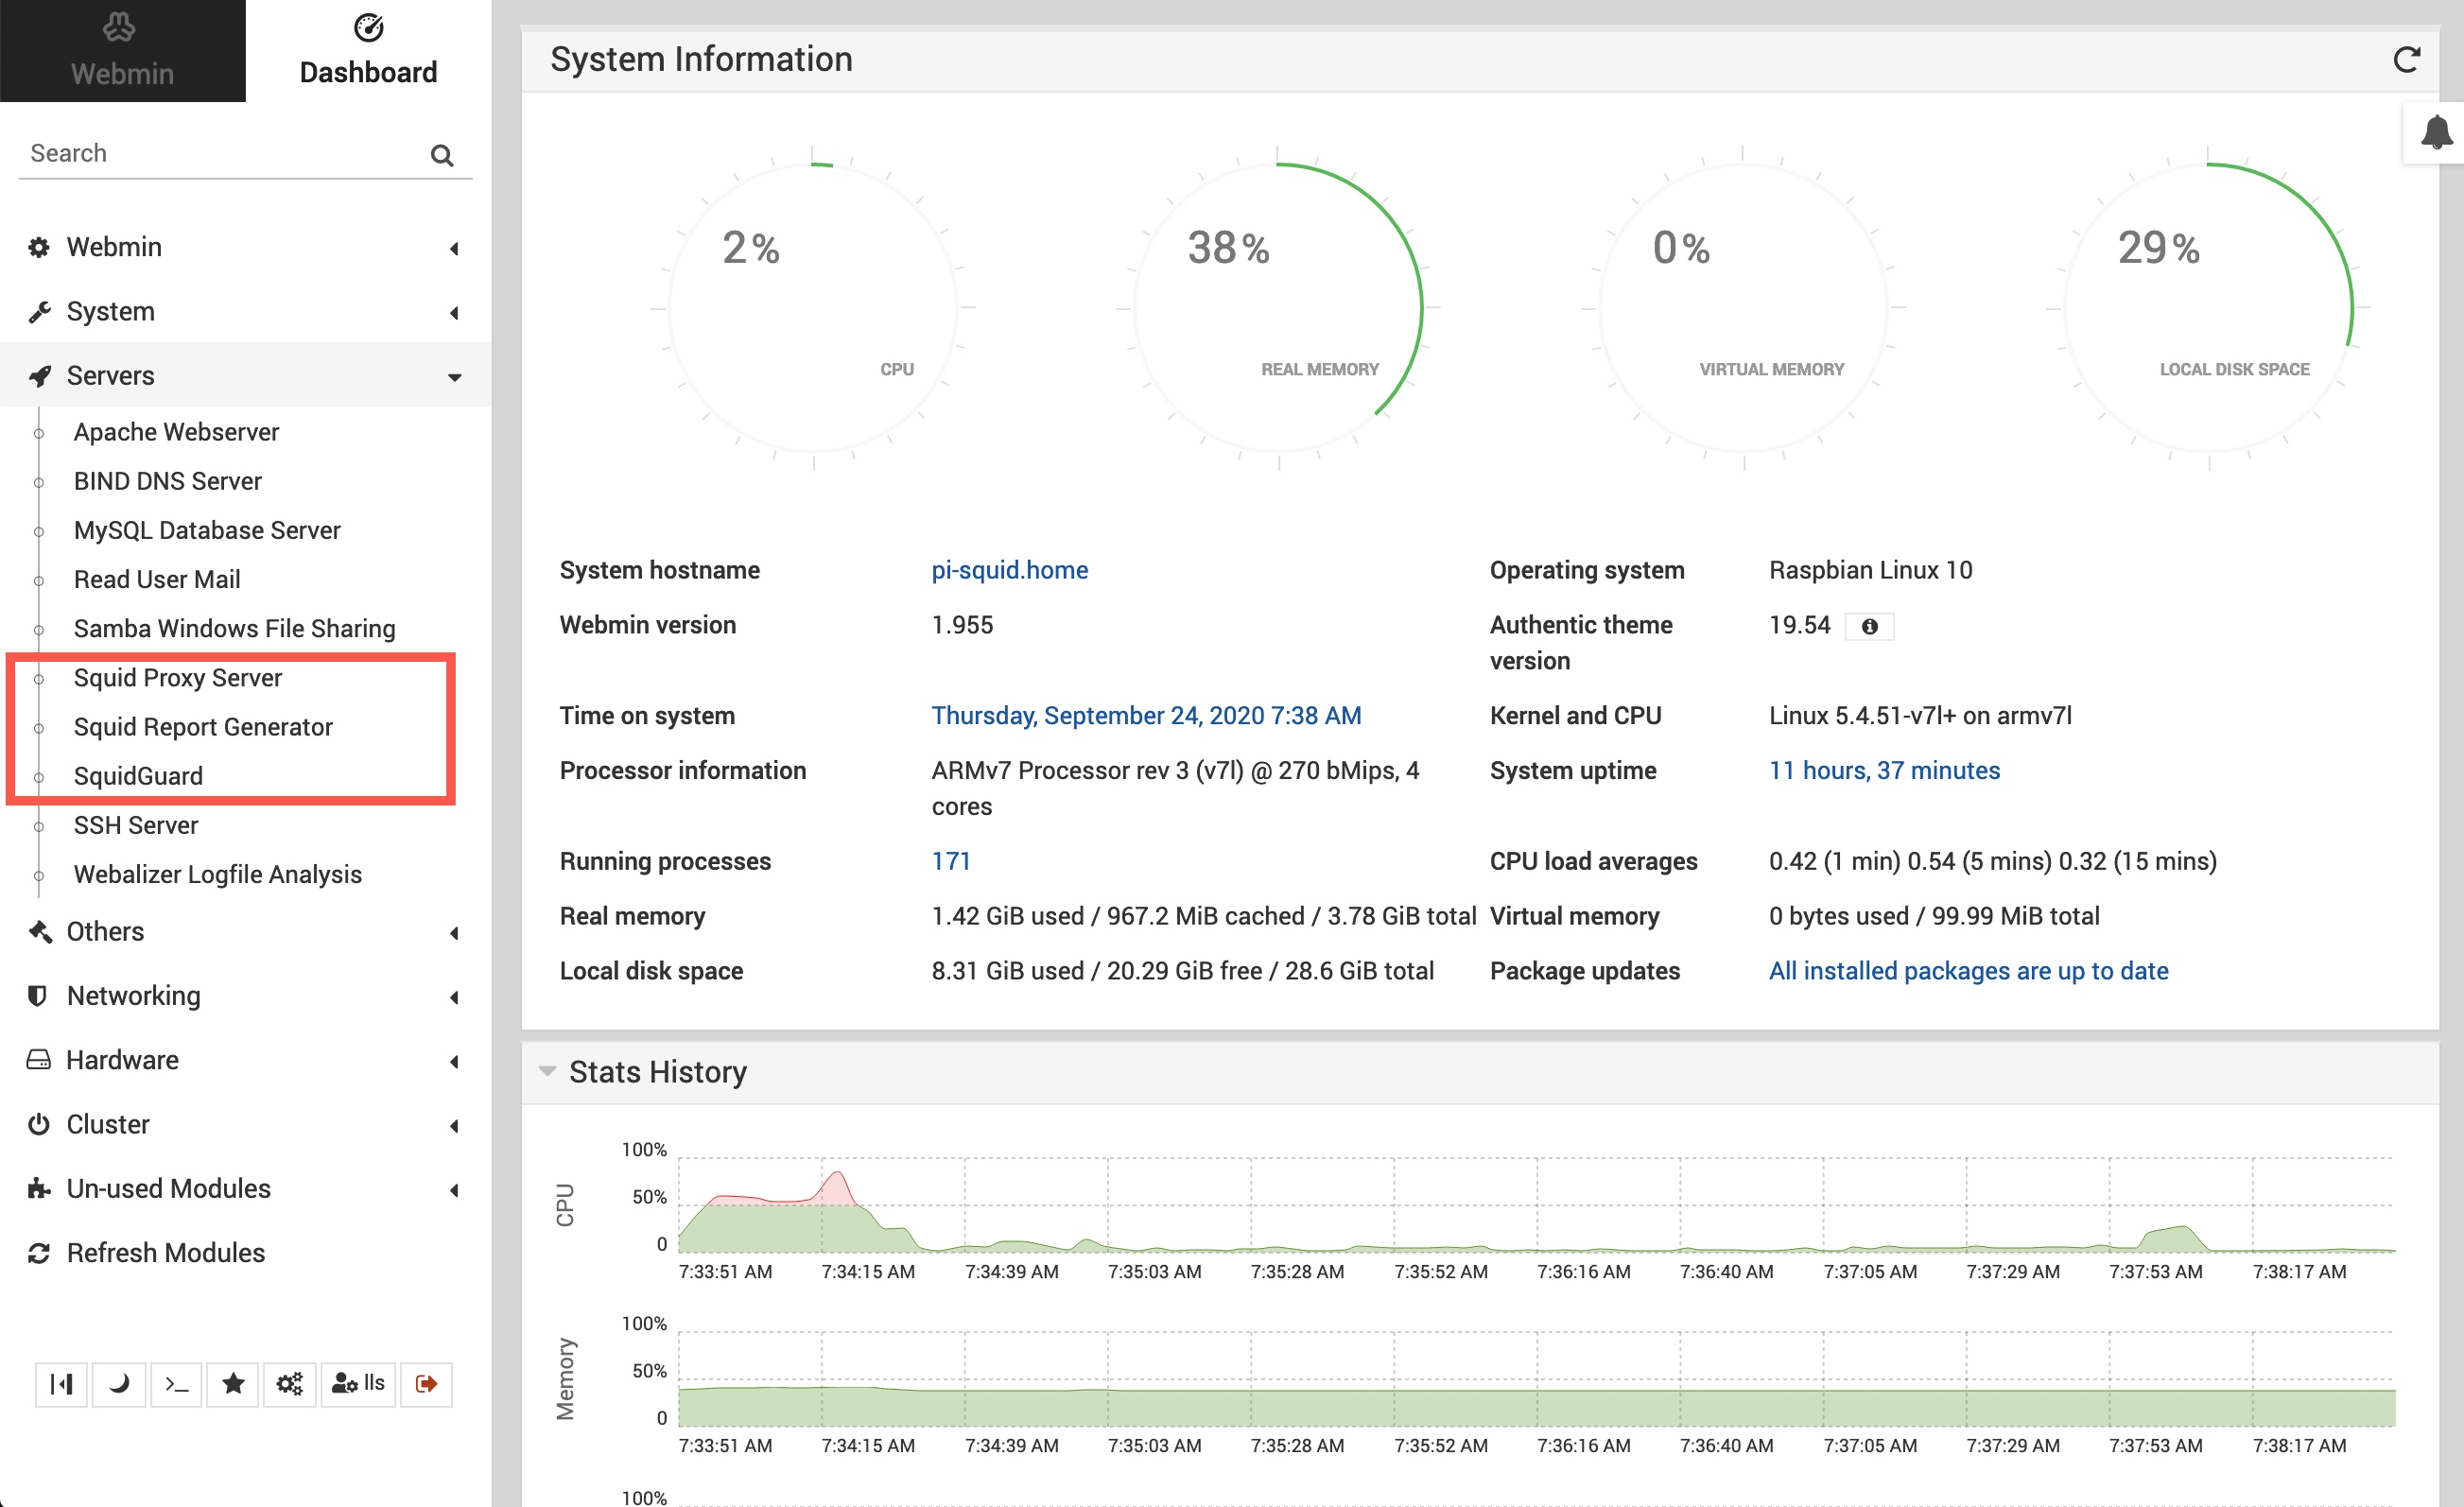
Log in to your Webmin portal. Adjust the IP address
If you have installed Squid and SquidGuard modules, you will see them on the server menu
mSMTP
This is useful if you want your Raspberry Pi tp send you reports by email
Install msmtp
sudo apt-get install msmtp msmtp-mta
Create new file in /etc
cd /etc
sudo touch msmtprc
sudo nano /etc/msmtprc
Open the msmtprc file you just created and copy paste the following. Adjust as needed
# Set default values for all following accounts.
defaults
port 587
tls on
tls_trust_file /etc/ssl/certs/ca-certificates.crt

account gmail
host smtp.gmail.com
from me@gmail.com
auth on
user me@gmail.com
password my_gmail_password

# Set a default account
account default : gmail
Test it!
Use your email address
echo -e "Subject: Test Mail\r\n\r\nThis is a test mail" | msmtp --debug --from=default -t me@gmail.com
Part 4: Logs
CCZE
Install CCZE
sudo apt-get install ccze
Check some logs
SquidGuard
sudo tail -f /var/log/squidguard/squidGuard.log | ccze
sudo tail -f /var/log/squidguard/adult.log | ccze
sudo tail -f /var/log/squidguard/malware.log | ccze
sudo tail -f /var/log/squidguard/phishing.log | ccze
Squid
sudo tail -f /var/log/squid/cache.log | ccze
sudo tail -f /var/log/squid/access.log | ccze
Clamav
sudo tail -f /var/log/clamav/clamav.log | ccze
sudo tail -f /var/log/clamav/freshclam.log | ccze
Danted
sudo tail -f /var/log/syslog | ccze
Nginx
sudo tail -f /var/log/nginx/error.log | ccze
Privoxy
sudo tail -f /var/log/privoxy/logfile | ccze